Earlier today, RunRev announced the availability of LiveCode 4.5 - the new name and version for the development platform Revolution.
If you've come here and don't know what LiveCode/Revolution is: it is a cross-platform development tool for Windows, MacOSX and Linux, sporting a very-high-level-language that allows you to create working solutions in far less time than other tools and languages. The LiveCode Web browser plug-in works very similar to Flash and Silverlight. There are also pre-releases available of LiveCode Server (comparable to a PHP engine) and LiveCode for iOS (yep, IPhone, iPad and iPod Touch).
Whenever I get a chance, I'll use LiveCode to put together a quick tool for my own use, or a prototype/mockup for something that will eventually be developed in another language like Progress OpenEdge ABL or Java. I also offer Quartam Reports for LiveCode, the essential report generator, and Quartam PDF Library, for those occasions when you need to go beyond 'print to pdf file'.
Where Java is built around a relatively small platform-specific Virtual Machine implementation, with a huge bytecode library on top, LiveCode has a far more optimized yet surprisingly lean core implementation for each supported operating system, and a rich language that means you'll type fewer lines of code to accomplish the same result.
I like the name change and the clearer product line-up. And I like how this new version is faster than ever before. Cheers to the RunRev team for wrapping it up after the setback concerning the iPhone/iPad implementation. Combined with Apple's recent liberation of developer tools, the future looks decidedly LiveCode!
Showing posts with label revolution. Show all posts
Showing posts with label revolution. Show all posts
Monday, September 20, 2010

Sunday, September 12, 2010
XML validation using a DTD and Versions
In a previous post, I invetigated how we could validate an XML file in revTalk by using a DTD. As we all know, requirements evolve and our software needs to adapt likewise, especially at the integration end-points. So if we need to accept more data, we should (a) know that it's coming, and (b) make sure it's there before we process the incoming data.
How do we do that? Well, as we've seen beofre, we can check the structure of the XML file. And to make sure we check it correctly, we should introduce a specification version for our XML structure, and attach it to the root node of the document as an attribute. Then all we need to do is check the root node, extract its SpecificationVersion attribute, and we can apply the correct DTD validation.
Doesn't sound too complicated, does it? Let's expand our current stack design a bit so that it looks like this:

As you can see, the field "DTD" was renamed to "DTD 1.0" and another field "DTD 1.1" was added to hold the DTD for specification version 1.1; finally, I moved down the "Validate" button and modified its script:
So how does this new version work?
- first, it parses the XML document
- next, it verifies the root node
- next, it checks the specification version
- next, it loads the appropriate DTD
- finally, it validates the XML against the DTD
If we test it, it correctly informs us that the XML document conforms to our specification version 1.1. What happens if we change the SpecificationVersion to 1.2?

Then we get this error message:

And finally, what happens if we change the SpecificationVersion to the original 1.0?

Then we get this error message:

This is a much safer way to check the incoming data in XML format. Unfortunately, a Document Type Definition is quite a limited way of XML validation. So next time, we'll improve our defenses again, by incorporating XML Schemas.
How do we do that? Well, as we've seen beofre, we can check the structure of the XML file. And to make sure we check it correctly, we should introduce a specification version for our XML structure, and attach it to the root node of the document as an attribute. Then all we need to do is check the root node, extract its SpecificationVersion attribute, and we can apply the correct DTD validation.
Doesn't sound too complicated, does it? Let's expand our current stack design a bit so that it looks like this:

As you can see, the field "DTD" was renamed to "DTD 1.0" and another field "DTD 1.1" was added to hold the DTD for specification version 1.1; finally, I moved down the "Validate" button and modified its script:
constant kMaxVersion = 1.1

on mouseUp
   -- Load the XML into a local variable
   local tXmlText
   put field "XML" into tXmlText
   -- Parse the XML text into a Tree
   local tXmlTree
   put revCreateXmlTree(tXmlText, \
          false, \
          true,  \
          false) \
          into tXmlTree
   if tXmlTree is not an integer then
      answer error \
             "There is an error in the XML structure" & return & \
             tXmlTree  -- contains the full error message
   else
      -- Validate the root node
      local tRootNode
      put revXmlRootNode(tXmlTree) into tRootNode
      if tRootNode is not "RootNode" then
         answer error \
                "The XML root node should be 'RootNode'"
      else
         -- Validate the SpecVersion
         local tSpecVersion
         put revXmlAttribute(tXmlTree, tRootNode, \
                "SpecificationVersion") into tSpecVersion
         if tSpecVersion begins with "xmlerr" then
            answer error \
                   "The SpecificationVersion is missing"
         else if tSpecVersion > kMaxVersion then
            answer error \
                   "The SpecificationVersion " && tSpecVersion && \
                   "is newer than" && kMaxVersion
         else
            -- Load the corresponding DTD
            local tDtdText
            if tSpecVersion is 1.0 then
               put field "DTD 1.0" into tDtdText
            else
               put field "DTD 1.1" into tDtdText
            end if
            -- Validate the XML against the DTD
            local tValidationResult
            put revXmlValidateDTD(tXmlTree, tDtdText) \
                   into tValidationResult
            if tValidationResult is not empty then
               answer error \
                      "The XML structure does not conform" & \
                      return & tValidationResult
            else
               answer information "The XML conforms to the DTD"
            end if
         end if
      end if
      -- Cleanup
      revDeleteXmlTree tXmlTree
   end if
end mouseUp
So how does this new version work?
- first, it parses the XML document
- next, it verifies the root node
- next, it checks the specification version
- next, it loads the appropriate DTD
- finally, it validates the XML against the DTD
If we test it, it correctly informs us that the XML document conforms to our specification version 1.1. What happens if we change the SpecificationVersion to 1.2?

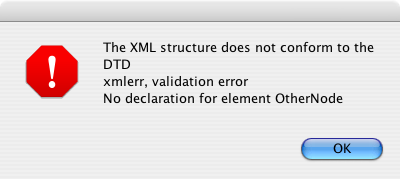
Then we get this error message:

And finally, what happens if we change the SpecificationVersion to the original 1.0?

Then we get this error message:
This is a much safer way to check the incoming data in XML format. Unfortunately, a Document Type Definition is quite a limited way of XML validation. So next time, we'll improve our defenses again, by incorporating XML Schemas.
Tuesday, September 7, 2010
XML validation using a DTD
One of the positive aspects of the Extensible Markup Language XML is that it is a flexible way to structure data in a human-readable format, in a cross-platform and technology-independent way. No wonder it is widely used as a way to exchange data between applications, and forms the foundation for XML-RPC, SOAP and other Web Service methods.
But it would be naive to think that every XML document that we get is not only well-formed, but also in the format that we expect it to be, with the right elements and attributes. In this post, we'll examine a strategy to validate incoming XML data in our revTalk application, using a Document Type Definition - a.k.a. DTD.
Part of the XML specification since the very start, a DTD describes the structure of the XML elements and attributes. For more information, I advise you to study the excellent introductory tutorials on W3Schools.com. We're here to use it from revTalk, so let's start by creating a new stack for the user interface.

Simply drop two scrolling fields onto it, name them "XML" and "DTD" respectively, and then group each of them separately so we can put a nice group label on top (I have the memory of a goldfish so I might forget which-is-which ;-) ) Finally drop a button at the bottom of the stack and set its name to "Validate" - and now we're ready to start scripting the button.
First things first, we need to parse the XML text into an XML tree to use all the rev XML commands and functions.
We use the revCreateXmlTree function to parse the XML text into a tree structure. If the XML test is not well-formed then we report the error, otherwise we know we have a valid XML tree structure at our disposal - which we need to cleanup after we're done, using the revDeleteXmlTree command. Now that we have the basics covered, we can add the DTD validation to our script.
If the XML conforms to the DTD, the revXmlValidateDtd function will return empty, otherwise its output contains the validation error. Pretty straightforward, so let's test this with a simple XML and DTD:

When we click the 'Validate' button, we get the message that the XML conforms to the DTD. Exactly what we were hoping for. Now let's change the XML somewhat to see if it fails when our XML text clearly does not conform to the DTD.

And here's the error message that we get on our screen:

With very little scripting, we have added a first layer of defense against incoming XML data that is not up to our specifications. Next time, we'll elaborate on this example and bolster our defenses.
But it would be naive to think that every XML document that we get is not only well-formed, but also in the format that we expect it to be, with the right elements and attributes. In this post, we'll examine a strategy to validate incoming XML data in our revTalk application, using a Document Type Definition - a.k.a. DTD.
Part of the XML specification since the very start, a DTD describes the structure of the XML elements and attributes. For more information, I advise you to study the excellent introductory tutorials on W3Schools.com. We're here to use it from revTalk, so let's start by creating a new stack for the user interface.

Simply drop two scrolling fields onto it, name them "XML" and "DTD" respectively, and then group each of them separately so we can put a nice group label on top (I have the memory of a goldfish so I might forget which-is-which ;-) ) Finally drop a button at the bottom of the stack and set its name to "Validate" - and now we're ready to start scripting the button.
First things first, we need to parse the XML text into an XML tree to use all the rev XML commands and functions.
on mouseUp
   -- Load DTD and XML into local variables
   local tDtdText, tXmlText
   put field "DTD" into tDtdText
   put field "XML" into tXmlText
   -- Parse the XML text into a Tree
   local tXmlTree
   put revCreateXmlTree(tXmlText, \
          false, \ -- must be well-formed
          true,  \ -- create a tree in memory
          false) \ -- no SAX parser messages
          into tXmlTree
   if tXmlTree is not an integer then
      answer error \
             "There is an error in the XML structure" & return & \
             tXmlTree  -- contains the full error message
   else
      -- Clean up resources
      revDeleteXmlTree tXmlTree
   end if
end mouseUp
We use the revCreateXmlTree function to parse the XML text into a tree structure. If the XML test is not well-formed then we report the error, otherwise we know we have a valid XML tree structure at our disposal - which we need to cleanup after we're done, using the revDeleteXmlTree command. Now that we have the basics covered, we can add the DTD validation to our script.
on mouseUp
   -- Load DTD and XML into local variables
   local tDtdText, tXmlText
   put field "DTD" into tDtdText
   put field "XML" into tXmlText
   -- Parse the XML text into a Tree
   local tXmlTree
   put revCreateXmlTree(tXmlText, \
          false, \  -- must be well-formed
          true, \ -- create a tree in memory
          false) \ -- no SAX parser messages
          into tXmlTree
   if tXmlTree is not an integer then
      answer error \
             "There is an error in the XML structure" & return & \
             tXmlTree  -- contains the full error message
   else
      -- Validate the XML against the DTD
      local tValidationResult
      put revXmlValidateDTD(tXmlTree, tDtdText) \
             into tValidationResult
      if tValidationResult is not empty then
         answer error \
                "XML structure does not conform to the DTD" & return & \
                tValidationResult  -- contains the full error message
      else
         answer information "The XML conforms to the DTD"
      end if
      -- Clean up resources
      revDeleteXmlTree tXmlTree
   end if
end mouseUp
If the XML conforms to the DTD, the revXmlValidateDtd function will return empty, otherwise its output contains the validation error. Pretty straightforward, so let's test this with a simple XML and DTD:

When we click the 'Validate' button, we get the message that the XML conforms to the DTD. Exactly what we were hoping for. Now let's change the XML somewhat to see if it fails when our XML text clearly does not conform to the DTD.

And here's the error message that we get on our screen:

With very little scripting, we have added a first layer of defense against incoming XML data that is not up to our specifications. Next time, we'll elaborate on this example and bolster our defenses.
Wednesday, August 18, 2010
Fun with detailed files - and stat
In a previous post, I tried to find a way to convert Unix user and group ids into their corresponding names. After I reported my findings to the use-revolution mailing list, Andre Garzia stepped in, suggesting to take a look at the stat command.
Calling 'stat' through the shell function for every file would be costly and slow; using it to fetch the information for an entire folder in one go wouldn't be so bad, but if you already use the detailed files function built into revTalk, it would seem like a waste of cycles. So I decided to rewrite my work handlers, employing a caching mechanism for the id-to-name mapping, and using 'stat' to pick up the mapping information not available in the cache.
Armed with the above set of commands and functions, we can still use the detailed files function and obtain user and group names from a cache, calling into 'stat' as necessary. Let's update our sample button script:
The more observant amongst you may think "If all you needed was a file's user and group name, why not just 'stat' and get it over with?" - well, the detailed files function returns a lot of useful information in one go, including the size of the resource fork of a file on MacOS systems.
Just one more thing: the 'stat' function was added in MacOS X 10.4 Tiger - so if your application still needs to support MacOS X 10.3 Panther, you're going to have to merge in the 'nireport' call from the previous post. Consider it an exercise for the reader.
On to the next challenge!
Calling 'stat' through the shell function for every file would be costly and slow; using it to fetch the information for an entire folder in one go wouldn't be so bad, but if you already use the detailed files function built into revTalk, it would seem like a waste of cycles. So I decided to rewrite my work handlers, employing a caching mechanism for the id-to-name mapping, and using 'stat' to pick up the mapping information not available in the cache.
--> script-local 'static' variables

local sGroupIdMap, sUserIdMap

--> public functions and commands

command LoadIdMaps
  p_LoadGroupIdMap
  p_LoadUserIdMap
end LoadIdMaps

function GroupIdToName pGroupId, pFile
  local tName, tShellCommand
  put sGroupIdMap[pGroupId] into tName
  if tName is empty and the platform is "MacOS" then
    -- stat is only available on MacOS X
    put p_GetFileStat(pFile, "%Sg") into tName
    put tName into sGroupIdMap[pGroupId]
  end if
  return tName
end GroupIdToName

function UserIdToName pUserId, pFile
  local tName, tShellCommand
  put sUserIdMap[pUserId] into tName
  if tName is empty and the platform is "MacOS" then
    -- stat is only available on MacOS X
    put p_GetFileStat(pFile, "%Su") into tName
    put tName into sUserIdMap[pUserId]
  end if
  return tName
end UserIdToName

--> private functions and commands

private function p_GetFileStat pFile, pFormat
  local tName, tShellCommand
  -- make sure to escape spaces in the file name
  replace space with backslash & space in pFile
  put "stat -f" && pFormat && pFile into tShellCommand
  put word 1 of shell(tShellCommand) into tName
  return tName
end p_GetFileStat

private command p_LoadGroupIdMap
  if the platform is "Win32" then exit p_LoadGroupIdMap
  p_LoadFileIdMap "/etc/group", sGroupIdMap
end p_LoadGroupIdMap

private command p_LoadUserIdMap
  if the platform is "Win32" then exit p_LoadUserIdMap
  p_LoadFileIdMap "/etc/passwd", sUserIdMap
end p_LoadUserIdMap

private command p_LoadFileIdMap pFile, @pIdMap
  local tData, tLine
  put URL ("file:" & pFile) into tData
  set the itemDelimiter to colon
  repeat for each line tLine in tData
    -- skip empty and comment lines
    if tLine is empty \
        or char 1 of tLine is "#" then next repeat
    -- fill the id map
    put item 1 of tLine into pIdMap[item 3 of tLine]
  end repeat
end p_LoadFileIdMap
Armed with the above set of commands and functions, we can still use the detailed files function and obtain user and group names from a cache, calling into 'stat' as necessary. Let's update our sample button script:
on mouseUp
  local tOldFolder, tNewFolder, tDetailedFiles
  answer folder "Select a folder"
  if the result is "Cancel" then exit mouseUp
  put it into tNewFolder
  --> extract the detailed files information
  put the defaultFolder into tOldFolder
  set the defaultFolder to tNewFolder
  put the detailed files into tDetailedFiles
  --> load the group and user id maps
  LoadIdMaps
  --> build the extended file information
  local tDetailedFile, tExtendedFiles
  local tFile, tUserId, tGroupId
  repeat for each line tDetailedFile in tDetailedFiles
    -- skip hidden files
    if char 1 of tDetailedFile is "." then next repeat
    -- fill the extended file entry
    put urlDecode(item 1 of tDetailedFile) into tFile
    put item 8 of tDetailedFile into tUserId
    put item 9 of tDetailedFile into tGroupId
    put tFileName & tab & \
        UserIdToName(tUserId, tFile) & tab & \
        GroupIdToName(tGroupId, tFile) & return \
        after tExtendedFiles
  end repeat
  --> wrap things up
  set the defaultFolder to tOldFolder
  put char 1 to -2 of tExtendedFiles into field "Files"
end mouseUp
The more observant amongst you may think "If all you needed was a file's user and group name, why not just 'stat' and get it over with?" - well, the detailed files function returns a lot of useful information in one go, including the size of the resource fork of a file on MacOS systems.
Just one more thing: the 'stat' function was added in MacOS X 10.4 Tiger - so if your application still needs to support MacOS X 10.3 Panther, you're going to have to merge in the 'nireport' call from the previous post. Consider it an exercise for the reader.
On to the next challenge!
Tuesday, August 17, 2010
Fun with detailed files
Earlier today, the following question was posted on the use-revolution mailing list: file owner & group names. Rev veteran Monte Goulding was wondering how to convert file owner and group ids into actual user and group names. I happily logged into the Solaris server at work and dug around a bit, finally replying that he could parse this information from the following two files:
And what would such a parsing script look like in revTalk? I'm glad you asked:
Given that both files use a colon as item delimiter, and have the name as first item and the id as third item, I extracted the parsing into a separate private command. Put the above handlers in your stack script, and then fetch each id-to-name-mapping before interpreting the detailed files.
Here's a simple button script that uses the above commands:
Once I got home, I wanted to verify this on my MacOS X machine, only to discover that it wasn't properly mapping the uid and gid to user and group names. Intrigued, I dug a bit deeper and found out that MacOS X actually relies on a DirectoryService when it's not running in single-user mode. Lovely, but how can we get what we need using revTalk?
Well, it turns out you can use the nireport command via the shell function to fetch a list of the group and user names with id. So let's add another helper command to do things the MacOS X way, and update our existing commands to use the correct approach, depending on the platform.
This seemed to do the trick on my iMac PowerPC G5 running MacOS X 10.4 Tiger - but when I tried it on my MacBook Pro Intel running MacOS X 10.6 Snow Leopard, it failed as there is no "nireport" command available. As it turns out, Apple dropped NetInfo when MacOS X 10.5 Leopard came out. So my solution is not quite complete, unfortunately.
To be continued...
/etc/group
/etc/passwd
And what would such a parsing script look like in revTalk? I'm glad you asked:
command LoadGroupIdMap @pGroupIdMap
  p_LoadFileIdMap "/etc/group", pGroupIdMap
end LoadGroupIdMap

command LoadUserIdMap @pUserIdMap
  p_LoadFileIdMap "/etc/passwd", pUserIdMap
end LoadUserIdMap

private command p_LoadFileIdMap pFile, @pIdMap
  local tData, tLine
  put URL ("file:" & pFile) into tData
  set the itemDelimiter to colon
  repeat for each line tLine in tData
    -- skip empty and comment lines
    if tLine is empty \
        or char 1 of tLine is "#" then next repeat
    -- fill the id map
    put item 1 of tLine into pIdMap[item 3 of tLine]
  end repeat
end p_LoadFileIdMap
Given that both files use a colon as item delimiter, and have the name as first item and the id as third item, I extracted the parsing into a separate private command. Put the above handlers in your stack script, and then fetch each id-to-name-mapping before interpreting the detailed files.
Here's a simple button script that uses the above commands:
on mouseUp
  local tOldFolder, tNewFolder, tDetailedFiles
  answer folder "Select a folder"
  if the result is "Cancel" then exit mouseUp
  put it into tNewFolder
  --> extract the detailed files information
  put the defaultFolder into tOldFolder
  set the defaultFolder to tNewFolder
  put the detailed files into tDetailedFiles
  set the defaultFolder to tOldFolder
  --> load the group and user id maps
  local tGroupIdMap, tUserIdMap
  LoadGroupIdMap tGroupIdMap
  LoadUserIdMap tUserIdMap
  --> build the extended file information
  local tDetailedFile, tExtendedFiles
  repeat for each line tDetailedFile in tDetailedFiles
    -- skip hidden files
    if char 1 of tDetailedFile is "." then next repeat
    -- fill the extended file entry
    put urlDecode(item 1 of tDetailedFile) & tab & \
        tUserIdMap[item 8 of tDetailedFile] & tab & \
        tGroupIdMap[item 9 of tDetailedFile] & return \
        after tExtendedFiles
  end repeat
  --> wrap things up
  put char 1 to -2 of tExtendedFiles into field "Files"
end mouseUp
Once I got home, I wanted to verify this on my MacOS X machine, only to discover that it wasn't properly mapping the uid and gid to user and group names. Intrigued, I dug a bit deeper and found out that MacOS X actually relies on a DirectoryService when it's not running in single-user mode. Lovely, but how can we get what we need using revTalk?
Well, it turns out you can use the nireport command via the shell function to fetch a list of the group and user names with id. So let's add another helper command to do things the MacOS X way, and update our existing commands to use the correct approach, depending on the platform.
command LoadGroupIdMap @pGroupIdMap
  if the platform is "MacOS" then
    p_LoadNireportIdMap "/groups gid name", pGroupIdMap
  else if the platform is "Linux" then
    p_LoadFileIdMap "/etc/group", pGroupIdMap
  end if
end LoadGroupIdMap

command LoadUserIdMap @pUserIdMap
  if the platform is "MacOS" then
    p_LoadNireportIdMap "/users uid name", pUserIdMap
  else if the platform is "Linux" then
    p_LoadFileIdMap "/etc/passwd", pUserIdMap
  end if
end LoadUserIdMap

private command p_LoadFileIdMap pFile, @pIdMap
  local tData, tLine
  put URL ("file:" & pFile) into tData
  set the itemDelimiter to colon
  repeat for each line tLine in tData
    -- skip empty and comment lines
    if tLine is empty \
        or char 1 of tLine is "#" then next repeat
    -- fill the id map
    put item 1 of tLine into pIdMap[item 3 of tLine]
  end repeat
end p_LoadFileIdMap

private command p_LoadNireportIdMap pParams, @pIdMap
  local tData, tLine
  put shell ("nireport ." && pParams) into tData
  set the itemDelimiter to tab
  repeat for each line tLine in tData
    put item 2 of tLine into pIdMap[item 1 of tLine]
  end repeat
end p_LoadNireportIdMap
This seemed to do the trick on my iMac PowerPC G5 running MacOS X 10.4 Tiger - but when I tried it on my MacBook Pro Intel running MacOS X 10.6 Snow Leopard, it failed as there is no "nireport" command available. As it turns out, Apple dropped NetInfo when MacOS X 10.5 Leopard came out. So my solution is not quite complete, unfortunately.
To be continued...
Sunday, August 1, 2010
BorderLayout example - with resizing
In a previous post, I examined how you can mimic Java's BorderLayout behavior in revTalk. At the end of that post, I promised to explain how you can add resizers to the West and East panels. Just as a reminder, here's what we had accomplished in the previous installment:
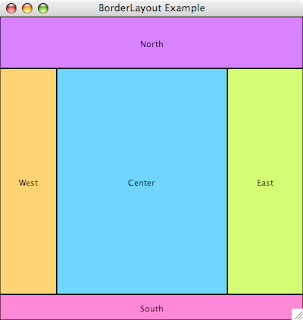
Before we get to the meat of the resizers, let's do some preparation work. To clearly show the user that he can drag around the resizers, we'll make a local copy of the vertical divide resize cursor that the RunRev team ships with the IDE. Open the message box and type:
We'll be using that as our cursor later, but it doesn't have to be visible for that to work - so you can hide it now. Next, we add a rectangular button, carefully placing it over the touching edges of the West and Center panels. Set the button's name to "WestResizer" and its width to 5, and make sure its height is the same as the West and Center panel. Here's what it should look like:

Before we add the script, we'll also add two custom properties to the West graphic:
-set the uMinWidth custom property to 75
-set the uMaxWidth custom property to 150
Now that we have the visuals worked out, let's script the resizer button:
While it's not too long a script, some explanation is in order:
- the mouseEnter and mouseLeave messages are handled to update the cursor
- the mouseDown message is handled to setup a few script local variables:
-> the sIsResizing variable is used as a flag to track the status
-> the sMinX and sMaxX variables are calculated once, based on the offset between the mouse and the resizer button, and taking into account the minimum and maximum width we set earlier
-> calculating those once helps cut down on the math later on
- the mouseUp and mouseRelease messages are handled to turn off the sIsResizing flag
- the mouseMove message is handled to resize the West and Center panels
-> but only if the sIsResizing flag is true
-> it uses the sMinX and sMaxX variables to make sure we don't go too far either way
-> it updates the resizer button itself, the West panel, and the Center panel.
To make this work, we obviously also have to add a handler for our custom 'resizeCenterPanel' event. We'll add that to the card script in a bit, after we've finished the resizer for the East panel. So duplicate the WestResizer button, name the copy EastResizer and move it over to the right, placing it over the touching edges of the East and Center panels.
Before we add the script, we'll also add two custom properties to the East graphic:
-set the uMinWidth custom property to 100
-set the uMaxWidth custom property to 200
Next, update its script to:
The difference with the WestResizer is that the EastResizer also has to take into account the width of the stack, but that's not too complicated. Finally we'll update the card script, adding a handler for the 'resizeCenterPanel' custom event, and we'll also take care of updating the resizer's location and height when the stack is resized. The new card script looks like this:
And there we have it: a BorderLayout with resizers for the West and East panels.

Once you're happy with the way the resizers work, you can change the style of the WestResizer and EastResizer button to transparent. They'll continue to work just fine, but won't be visible. With a little more work, you can also add resizers for the North and South panels. But I'll leave that as an exercise to the reader...

Before we get to the meat of the resizers, let's do some preparation work. To clearly show the user that he can drag around the resizers, we'll make a local copy of the vertical divide resize cursor that the RunRev team ships with the IDE. Open the message box and type:
copy image "vdividecursor.gif" of card id 1030 of stack "revMacCursors" to this card
We'll be using that as our cursor later, but it doesn't have to be visible for that to work - so you can hide it now. Next, we add a rectangular button, carefully placing it over the touching edges of the West and Center panels. Set the button's name to "WestResizer" and its width to 5, and make sure its height is the same as the West and Center panel. Here's what it should look like:

Before we add the script, we'll also add two custom properties to the West graphic:
-set the uMinWidth custom property to 75
-set the uMaxWidth custom property to 150
Now that we have the visuals worked out, let's script the resizer button:
local sIsResizing
local sMinX, sMaxX

on mouseEnter
   lock cursor
   set the cursor to the short id of image "vdividecursor.gif"
end mouseEnter

on mouseLeave
   unlock cursor
end mouseLeave

on mouseDown
   local tMouseOffset
   put item 1 of the mouseLoc - item 1 of the location of me \
       into tMouseOffset
   put the uMinWidth of graphic "West" + tMouseOffset into sMinX
   put the uMaxWidth of graphic "West" + tMouseOffset into sMaxX
   put true into sIsResizing
   pass mouseDown
end mouseDown

on mouseUp
   put false into sIsResizing
   pass mouseUp
end mouseUp

on mouseRelease
   put false into sIsResizing
   pass mouseRelease
end mouseRelease

on mouseMove x,y
   if sIsResizing is true then
      local tNewX
      put min(max(x, sMinX), sMaxX) into tNewX
      lock screen
      set the left of me to tNewX - 3
      set the widthFromLeft of graphic "West" to tNewX
      dispatch "resizeCenterPanel" to this card
      unlock screen
   end if
   pass mouseMove
end mouseMove
While it's not too long a script, some explanation is in order:
- the mouseEnter and mouseLeave messages are handled to update the cursor
- the mouseDown message is handled to setup a few script local variables:
-> the sIsResizing variable is used as a flag to track the status
-> the sMinX and sMaxX variables are calculated once, based on the offset between the mouse and the resizer button, and taking into account the minimum and maximum width we set earlier
-> calculating those once helps cut down on the math later on
- the mouseUp and mouseRelease messages are handled to turn off the sIsResizing flag
- the mouseMove message is handled to resize the West and Center panels
-> but only if the sIsResizing flag is true
-> it uses the sMinX and sMaxX variables to make sure we don't go too far either way
-> it updates the resizer button itself, the West panel, and the Center panel.
To make this work, we obviously also have to add a handler for our custom 'resizeCenterPanel' event. We'll add that to the card script in a bit, after we've finished the resizer for the East panel. So duplicate the WestResizer button, name the copy EastResizer and move it over to the right, placing it over the touching edges of the East and Center panels.
Before we add the script, we'll also add two custom properties to the East graphic:
-set the uMinWidth custom property to 100
-set the uMaxWidth custom property to 200
Next, update its script to:
local sIsResizing
local sMinX, sMaxX

on mouseEnter
   set the lockCursor to true
   set the cursor to the short id of image "vdividecursor.gif"
end mouseEnter

on mouseLeave
   set the lockCursor to false
end mouseLeave

on mouseDown
   local tMouseOffset
   put item 1 of the mouseLoc - item 1 of the location of me \
       into tMouseOffset
   put the width of this stack - \
       the uMinWidth of graphic "East" + \
       tMouseOffset into sMaxX
   put the width of this stack - \
       the uMaxWidth of graphic "East" + \
       tMouseOffset into sMinX
   put true into sIsResizing
   pass mouseDown
end mouseDown

on mouseUp
   put false into sIsResizing
   pass mouseUp
end mouseUp

on mouseRelease
   put false into sIsResizing
   pass mouseRelease
end mouseRelease

on mouseMove x,y
   if sIsResizing is true then
      local tNewX
      put min(max(x, sMinX), sMaxX) into tNewX
      lock screen
      set the left of me to tNewX - 3
      set the left of graphic "East" to tNewX
      set the widthFromLeft of graphic "East" to \
          the width of this stack - tNewX
      dispatch "resizeCenterPanel" to this card
      unlock screen
   end if
   pass mouseMove
end mouseMove
The difference with the WestResizer is that the EastResizer also has to take into account the width of the stack, but that's not too complicated. Finally we'll update the card script, adding a handler for the 'resizeCenterPanel' custom event, and we'll also take care of updating the resizer's location and height when the stack is resized. The new card script looks like this:
on resizeStack pNewWidth, pNewHeight
   local tCenterHeight, tCenterWidth
   --
   lock screen
   -- update the north and south panels
   set the widthFromLeft of graphic "North" to pNewWidth
   set the widthFromLeft of graphic "South" to pNewWidth
   set the bottom of graphic "South" to pNewHeight
   put the top of graphic "South" - \
       the bottom of graphic "North" \
       into tCenterHeight
   -- update the west and east panels
   set the heightFromTop of graphic "West" to tCenterHeight
   set the heightFromTop of graphic "East" to tCenterHeight
   set the right of graphic "East" to pNewWidth
   put the left of graphic "East" - \
       the right of graphic "West" \
       into tCenterWidth
   -- update the west and east resizers
   set the heightFromTop of button "WestResizer" to tCenterHeight
   set the heightFromTop of button "EastResizer" to tCenterHeight
   set the left of button "EastResizer" to \
       the left of graphic "East" - 3
   -- update the center panel
   set the widthFromLeft of graphic "Center" to tCenterWidth
   set the heightFromTop of graphic "Center" to tCenterHeight
   --
   unlock screen
   pass resizeStack
end resizeStack

--> custom event handlers

on resizeCenterPanel
   local tCenterWidth, tCenterHeight
   put the top of graphic "South" - \
       the bottom of graphic "North" \
       into tCenterHeight
   put the left of graphic "East" - \
       the right of graphic "West" \
       into tCenterWidth
   lock screen
   set the left of graphic "Center" to the right of graphic "West"
   set the top of graphic "Center" to the bottom of graphic "North"
   set the widthFromLeft of graphic "Center" to tCenterWidth
   set the heightFromTop of graphic "Center" to tCenterHeight
   unlock screen
   pass resizeCenterPanel
end resizeCenterPanel

--> helper property setters

setProp widthFromLeft pNewWidth
   local tRectangle
   --
   lock screen
   put the rectangle of the target into tRectangle
   put item 1 of tRectangle + pNewWidth into item 3 of tRectangle
   set the rectangle of the target to tRectangle
   unlock screen
end widthFromLeft

setProp heightFromTop pNewHeight
   local tRectangle
   --
   lock screen
   put the rectangle of the target into tRectangle
   put item 2 of tRectangle + pNewHeight into item 4 of tRectangle
   set the rectangle of the target to tRectangle
   unlock screen
end heightFromTop
And there we have it: a BorderLayout with resizers for the West and East panels.

Once you're happy with the way the resizers work, you can change the style of the WestResizer and EastResizer button to transparent. They'll continue to work just fine, but won't be visible. With a little more work, you can also add resizers for the North and South panels. But I'll leave that as an exercise to the reader...
Monday, July 26, 2010
BorderLayout example script
As you may know, I spend quite a bit of my time in Java, not merely building back-end systems with message queues and raw socket communication, but also creating user interfaces in Swing. One of the most compelling features of Swing is its system of LayoutManagers - and certainly the easiest-to-use is the BorderLayout. Today, I'm going to explain how you can mimic this type of layout handling in revTalk.
The principle of the BorderLayout is quite simple: it divides the window into 5 panels: North, East, South, West and Center. As a picture says more than a thousand words, here's what this layout generally looks like:
The North panel is a good place to store a toolbar, the South panel usually plays host for a status area, while the West panel may show an outline, and the East panel a property grid, leaving the Center for the actual content.
For this example, I chose the easy route, creating a single rectangle graphic for each panel. I also picked distinct colors so you can more easily see the effect of resizing the window once the pieces of the puzzle fall into place. And it turns out it isn't that much work to implement, as I set the card script to:
Let's see what is happening here. The script handles the resizeStack event, which has 4 parameters (new width, new height, old width, old height) of which we only use the first two.
As the North and South panels use up the entire width, I can simply set their width to the new width of the stack. However, setting the width of a control in revTalk works from the location of the control (which is the center, not the topleft).
So I use a fake helper property setter 'widthFromLeft' to update the rectangle of the control instead. Finally, we move the South panel to the bottom edge of the window, and calculate the distance between the top of the south panel and the bottom of the north panel, as this is the new height for our West, East and Center panels.
Armed with this information, I follow a similar path for the West and East panels, updating their height using a fake helper property setter 'heightFromTop', and moving the East panel to the right edge of the window, calculating the distance between the east and west panels to determine the new width of the Center panel. And now it is dead-easy to update the Center panel with the calculated width and height.
That's all there is to it! Admittedly, this example merely resizes 5 graphics, but you can extend this logic to groups, handling the resizeControl message in your group scripts to automatically update the layout of the group's contents.
Here's what it looks like when stretched horizontally.
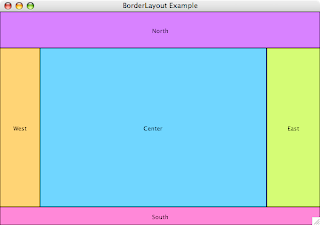
And here's what it looks like when stretched vertically.
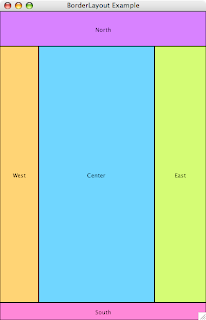
Straightforward to implement with very little code. Next time, I'll add some resizers for the West and East panels.
The principle of the BorderLayout is quite simple: it divides the window into 5 panels: North, East, South, West and Center. As a picture says more than a thousand words, here's what this layout generally looks like:
The North panel is a good place to store a toolbar, the South panel usually plays host for a status area, while the West panel may show an outline, and the East panel a property grid, leaving the Center for the actual content.
For this example, I chose the easy route, creating a single rectangle graphic for each panel. I also picked distinct colors so you can more easily see the effect of resizing the window once the pieces of the puzzle fall into place. And it turns out it isn't that much work to implement, as I set the card script to:
on resizeStack pNewWidth, pNewHeight
   local tCenterHeight, tCenterWidth
   --
   lock screen
   -- update the north and south panels
   set the widthFromLeft of graphic "North" to pNewWidth
   set the widthFromLeft of graphic "South" to pNewWidth
   set the bottom of graphic "South" to pNewHeight
   put the top of graphic "South" - \
       the bottom of graphic "North" \
       into tCenterHeight
   -- update the west and east panels
   set the heightFromTop of graphic "West" to \
       tCenterHeight
   set the heightFromTop of graphic "East" to \
       tCenterHeight
   set the right of graphic "East" to pNewWidth
   put the left of graphic "East" - \
       the right of graphic "West" \
       into tCenterWidth
   -- update the center panel
   set the widthFromLeft of graphic "Center" to \
       tCenterWidth
   set the heightFromTop of graphic "Center" to \
       tCenterHeight
   --
   unlock screen
   pass resizeStack
end resizeStack

--> helper property setters

setProp widthFromLeft pNewWidth
   local tRectangle
   --
   lock screen
   put the rectangle of the target into tRectangle
   put item 1 of tRectangle + pNewWidth \
       into item 3 of tRectangle
   set the rectangle of the target to tRectangle
   unlock screen
end widthFromLeft

setProp heightFromTop pNewHeight
   local tRectangle
   --
   lock screen
   put the rectangle of the target into tRectangle
   put item 2 of tRectangle + pNewHeight \
       into item 4 of tRectangle
   set the rectangle of the target to tRectangle
   unlock screen
end heightFromTop
Let's see what is happening here. The script handles the resizeStack event, which has 4 parameters (new width, new height, old width, old height) of which we only use the first two.
As the North and South panels use up the entire width, I can simply set their width to the new width of the stack. However, setting the width of a control in revTalk works from the location of the control (which is the center, not the topleft).
So I use a fake helper property setter 'widthFromLeft' to update the rectangle of the control instead. Finally, we move the South panel to the bottom edge of the window, and calculate the distance between the top of the south panel and the bottom of the north panel, as this is the new height for our West, East and Center panels.
Armed with this information, I follow a similar path for the West and East panels, updating their height using a fake helper property setter 'heightFromTop', and moving the East panel to the right edge of the window, calculating the distance between the east and west panels to determine the new width of the Center panel. And now it is dead-easy to update the Center panel with the calculated width and height.
That's all there is to it! Admittedly, this example merely resizes 5 graphics, but you can extend this logic to groups, handling the resizeControl message in your group scripts to automatically update the layout of the group's contents.
Here's what it looks like when stretched horizontally.

And here's what it looks like when stretched vertically.

Straightforward to implement with very little code. Next time, I'll add some resizers for the West and East panels.
Thursday, July 22, 2010
DataGrid Filter example - with sorting
The other day I posted an example of how you can add a filter to a DataGrid in Revolution. At the end of that blog post, I remarked how I had deliberately turned off column sorting. Fear not, it is straightforward to add support for this, again thanks to the DataGrid lessons available on the runrev.com website.
Just as a reminder, here's a screenshot of the example stack:

So what do we need to do to allow the user to click on the column header and apply the sort and filter at the same time? It's quite a simple bity of scripting, but before we get to that, you need to make some minor modifications to the datagrid columns.
- Switch to the 'pointer' tool, and select the datagrid, then open the Object Inspector, and switch to the 'Columns' panel
-> select the column 'index' and set its Sort by column type to 'Numeric'
-> select the column 'name' and make sure its Sort by column type is 'Text'
Now edit the script of the datagrid, and set it to:
What's changed in comparison to the last implementation? Well, the bulk of the necessary work is done in the new private command SortMap, which reads the column sort properties and uses a custom sort function to get the filtered lines in the right order on the basis of the column value in the original lines of data. Then it builds a new IndexMap to replace the old one, and the regular refresh routines of the datagrid will "just work."
So what happens when we sort the data descending on the name, without applying a filter?

Looking good - does the filter still work? Let's type 'url' into the filter field.

You may have noticed that I also added getProp-handlers for dgData and dgFilter, making the above script easily reusable. With just a bit of lateral thinking and coding, you too can build just about anything, thanks to Revolution.
Just as a reminder, here's a screenshot of the example stack:

So what do we need to do to allow the user to click on the column header and apply the sort and filter at the same time? It's quite a simple bity of scripting, but before we get to that, you need to make some minor modifications to the datagrid columns.
- Switch to the 'pointer' tool, and select the datagrid, then open the Object Inspector, and switch to the 'Columns' panel
-> select the column 'index' and set its Sort by column type to 'Numeric'
-> select the column 'name' and make sure its Sort by column type is 'Text'
Now edit the script of the datagrid, and set it to:
local sOriginalData
local sIndexMap
local sFilter

setProp dgData pData
  put pData into sOriginalData
  RebuildMap
end dgData

getProp dgData
  return sOriginalData
end dgData

setProp dgFilter pFilter
  put pFilter into sFilter
  RebuildMap
end dgFilter

getProp dgFilter
  return sFilter
end dgFilter

--> datagrid callbacks

on GetDataForLine pLine, @pData
  local tKey
  -- retrieve the original line of data
  put sIndexMap[pLine] into tKey
  put sOriginalData[tKey] into pData
end GetDataForLine

on SortDataGridColumn pColumn
  SortMap pColumn
  HiliteAndStoreSortByColumn pColumn
  dispatch "RefreshList" to me
end SortDataGridColumn

--> private commands and functions

private command RebuildMap
  local tKeys, tKey, tIndex
  put empty into sIndexMap
  put 0 into tIndex
  put the keys of sOriginalData into tKeys
  sort tKeys numeric
  repeat for each line tKey in tKeys
    if sFilter is empty \
    or sOriginalData[tKey]["name"] contains sFilter \
    then
      add 1 to tIndex
      put tKey into sIndexMap[tIndex]
    end if
  end repeat
  set the dgNumberOfRecords of me to tIndex
  SortMap
  dispatch "ResetList" to me
end RebuildMap

private command SortMap pColumn
  local tSortDirection, tSortType, tSortCaseSensitive
  local tSortCommand
  local tKeys, tKey, tNewIndex, tNewIndexMap
  -- works whether a column is specified or not
  if pColumn is empty then
    -- find the current sort column
    put the dgProps["sort by column"] of me into pColumn
    if pColumn is empty then
      exit SortMap
    end if
  end if
  -- assemble and do the sort command
  put the dgColumnSortDirection[pColumn] of me \
    into tSortDirection
  put the dgColumnSortType[pColumn] of me \
    into tSortType
  put the dgColumnSortCaseSensitive[pColumn] of me \
    into tSortCaseSensitive
  put "sort lines of tKeys" && tSortDirection \
    into tSortCommand
  switch tSortType
    case "numeric"
      put " numeric" after tSortCommand
      break
    case "international"
      put " international" after tSortCommand
      break
    case "datetime"
    case "system datetime"'
      put " dateTime" after tSortCommand
      break
  end switch
  put " by ColumnValueForLine(pColumn, each)" \
    after tSortCommand
  set the caseSensitive to \
    (tSortCaseSensitive is true)
  set the useSystemDate to \
    (tSortType is "system datetime")
  put the keys of sIndexMap into tKeys
  do tSortCommand
  -- rebuild the index map
  put 0 into tNewIndex
  repeat for each line tKey in tKeys
    add 1 to tNewIndex
    put sIndexMap[tKey] into \
      tNewIndexMap[tNewIndex]
  end repeat
  put tNewIndexMap into sIndexMap
end SortMap

private function ColumnValueForLine pColumn, pLine
  local tKey
  -- retrieve the original line of data
  put sIndexMap[pLine] into tKey
  return sOriginalData[tKey][pColumn]
end ColumnValueForLine
What's changed in comparison to the last implementation? Well, the bulk of the necessary work is done in the new private command SortMap, which reads the column sort properties and uses a custom sort function to get the filtered lines in the right order on the basis of the column value in the original lines of data. Then it builds a new IndexMap to replace the old one, and the regular refresh routines of the datagrid will "just work."
So what happens when we sort the data descending on the name, without applying a filter?

Looking good - does the filter still work? Let's type 'url' into the filter field.

You may have noticed that I also added getProp-handlers for dgData and dgFilter, making the above script easily reusable. With just a bit of lateral thinking and coding, you too can build just about anything, thanks to Revolution.
Monday, July 19, 2010
DataGrid Filter example
One of the powerful additions to Revolution 3.5 is the DataGrid - a custom control group that allows you to display any type of data with astonishing flexibility. Recently, I had to add filtering capabilities to a data grid for one of my projects. In this post, I will explain how I accomplished it, thanks to the DataGrid lessons available on the runrev.com website.
Here's a screenshot of the example stack:
Execute the following steps, if you want to follow along:
- Create a new stack
- Drag a button to the topleft of the card and set its name to "Fill"
- Drag a text field to the topright of the card
- Drag a label field next to the text field and set its content to "Filter:"
- Drag a data grid onto the card and configure it using the Object Inspector
-> In the 'Basic Properties' panel, turn off the checkbox "Allow Text Editing"
-> Switch to the 'Columns' panel, and add 2 columns "index" and "name"
-> Edit the script of the DataGrid, and set it to the following:
The above data grid script will take care of filtering the data. Now it's just a matter of wiring up the text field.
-> Edit the script of the text field and set it to the following:
By trapping the different key events, we can update the data grid filter as we go along. Note that I used the ScheduleUpdate helper command to try and minimize the number of refreshes for quick typers. Play around with the interval until you find the sweet spot of responsive user interface.
Finally, it is time to fill the data gird with some data for testing, so edit the script of the button and set it to the following:
This simple script will fill our data grid with a list of the built-in functions that revTalk has to offer. Click the button, and type away in the filter text field to see the effect. Here's what happens when I type "cos":

Looks pretty good, doesn't it? It certainly was good enough for my use, but there are a few things to bear in mind about this implementation:
- I didn't have to edit the data in the grid.
- I didn't have to support sorting for my particular project.
Both of these limitations can be overcome, but I'll leave that for another time...
Here's a screenshot of the example stack:
Execute the following steps, if you want to follow along:
- Create a new stack
- Drag a button to the topleft of the card and set its name to "Fill"
- Drag a text field to the topright of the card
- Drag a label field next to the text field and set its content to "Filter:"
- Drag a data grid onto the card and configure it using the Object Inspector
-> In the 'Basic Properties' panel, turn off the checkbox "Allow Text Editing"
-> Switch to the 'Columns' panel, and add 2 columns "index" and "name"
-> Edit the script of the DataGrid, and set it to the following:
local sOriginalData
local sIndexMap
local sFilter

setProp dgData pData
  put pData into sOriginalData
  RebuildMap
end dgData

setProp dgFilter pFilter
  put pFilter into sFilter
  RebuildMap
end dgFilter

private command RebuildMap
  local tKeys, tKey, tIndex
  put 0 into tIndex
  put the keys of sOriginalData into tKeys
  sort tKeys numeric
  repeat for each line tKey in tKeys
    if sFilter is empty \
    or sFilter is in sOriginalData[tKey]["name"] \
    then
      add 1 to tIndex
      put tKey into sIndexMap[tIndex]
    end if
  end repeat
  set the dgNumberOfRecords of me to tIndex
  dispatch "ResetList" to me
end RebuildMap

on GetDataForLine pLine, @pData
  local tKey
  put sIndexMap[pLine] into tKey
  put sOriginalData[tKey] into pData
end GetDataForLine

on SortDataGridColumn pColumn
  -- prevent column sorting
end SortDataGridColumn
The above data grid script will take care of filtering the data. Now it's just a matter of wiring up the text field.
-> Edit the script of the text field and set it to the following:
local sUpdateMsg

on keyUp pKey
  ScheduleUpdate
  pass keyUp
end keyUp

on deleteKey
  ScheduleUpdate
  pass deleteKey
end deleteKey

on backspaceKey
  ScheduleUpdate
  pass backspaceKey
end backspaceKey

on pasteKey
  ScheduleUpdate
  pass pasteKey
end pasteKey

on cutKey
  ScheduleUpdate
  pass cutKey
end cutKey

command ScheduleUpdate
  if sUpdateMsg is empty then
    send "UpdateFilter" to me in 100 milliseconds
    put the result into sUpdateMsg
  end if
end ScheduleUpdate

on UpdateFilter
  set the dgFilter of group "DataGrid 1" \
    to the text of me
  put empty into sUpdateMsg
end UpdateFilter
By trapping the different key events, we can update the data grid filter as we go along. Note that I used the ScheduleUpdate helper command to try and minimize the number of refreshes for quick typers. Play around with the interval until you find the sweet spot of responsive user interface.
Finally, it is time to fill the data gird with some data for testing, so edit the script of the button and set it to the following:
on mouseUp
  local tData, tIndex, tName
  put 0 into tIndex
  repeat for each line tName in the functionNames
    add 1 to tIndex
    put tIndex into tData[tIndex]["index"]
    put tName into tData[tIndex]["name"]
  end repeat
  set the dgData of group "DataGrid 1" to tData
end mouseUp
This simple script will fill our data grid with a list of the built-in functions that revTalk has to offer. Click the button, and type away in the filter text field to see the effect. Here's what happens when I type "cos":

Looks pretty good, doesn't it? It certainly was good enough for my use, but there are a few things to bear in mind about this implementation:
- I didn't have to edit the data in the grid.
- I didn't have to support sorting for my particular project.
Both of these limitations can be overcome, but I'll leave that for another time...
Sunday, March 14, 2010
But the waiting makes me curious
Be patient, is very good advice, but the waiting makes me curious.
It's a line from the song 'Very Good advice' written for the original Disney 'Alice in Wonderland' movie and recently remade by The Cure's Robert Smith for the 'Almost Alice' soundtrack. And I just couldn't think of a better introduction to this blog entry on the revTalk 'wait' command.
When your script is in a tight loop, screen updates my not happen until after the whole script is finished.
Rather than continuously updating the content of the field, the field may only get updated after the repeat loop. While that's good enough in this silly example, it's not suitable for keeping the user updated on the progress of a real-world data crunching routine.
You can give the engine some breathing room by inserting a call to the 'wait' command.
Now you'll see the content of the field refreshed regularly; but it also makes your loop much slower.
By only redrawing the screen every 25th iteration, we can still refresh the screen with less impact on performance. Play with the 'kRefresh' constant value to find the right redraw/performance ratio.
But that's not all the 'wait' command can do: if used properly, you can give your users a way to 'cancel' out of a tight loop.
Now we add a button "Cancel" and give it the following script:
And presto! Not only does the screen redraw, but we now allow the user to stop the time-consuming process in our tight loop. Of course you'll have to add your logic to 'revert' any changes you've made in the process, but the above provides you with a skeleton script for handling this sort of situation.
As with all good things in life, 'wait with messages' comes at a price: as the user can now click your button twice, or trigger other scripts, it is very important to disable those parts of your user interface that shouldn't be executed 'concurrently' - my favourite method is to switch to a 'limited' environment, disabling all controls, displaying a blended white overlay over them as well as the 'Cancel' button making it the only enabled control. After the loop, the stack returns to the 'unlimited' environment, hiding the overlay and enabling the controls.
Some of you may wonder what happens when a script issues 'wait 1 second with messages' and the user clicks on another button: the other button's script is executed first, and then the engine checks if the wait timeout has passed, and resumes the original script. This means that if your other button script takes 5 seconds to complete, your first button script will remain suspended - the revEngine is not multi-threaded. But with a little planning, you can provide a much better user experience.
It's a line from the song 'Very Good advice' written for the original Disney 'Alice in Wonderland' movie and recently remade by The Cure's Robert Smith for the 'Almost Alice' soundtrack. And I just couldn't think of a better introduction to this blog entry on the revTalk 'wait' command.
When your script is in a tight loop, screen updates my not happen until after the whole script is finished.
on mouseUp
  repeat with i = 1 to 5000
    put i into field "Output"
  end repeat
end mouseUp
Rather than continuously updating the content of the field, the field may only get updated after the repeat loop. While that's good enough in this silly example, it's not suitable for keeping the user updated on the progress of a real-world data crunching routine.
You can give the engine some breathing room by inserting a call to the 'wait' command.
on mouseUp
  repeat with i = 1 to 5000
    put i into field "Output"
    -- allow screen to redraw
    wait 0 milliseconds
  end repeat
end mouseUp
Now you'll see the content of the field refreshed regularly; but it also makes your loop much slower.
on mouseUp
  constant kRefresh = 25
  repeat with i = 1 to 5000
    put i into field "Output"
    if i mod kRefresh is 0 then
      -- allow screen to redraw
      wait 0 milliseconds
    end if
  end repeat
end mouseUp
By only redrawing the screen every 25th iteration, we can still refresh the screen with less impact on performance. Play with the 'kRefresh' constant value to find the right redraw/performance ratio.
But that's not all the 'wait' command can do: if used properly, you can give your users a way to 'cancel' out of a tight loop.
on mouseUp
  constant kRefresh = 25
  enable button "Cancel"
  set the uCancel of me to false
  repeat with i = 1 to 5000
    put i into field "Output"
    if i mod kRefresh is 0 then
      -- allow screen to redraw and user to cancel
      wait 0 milliseconds with messages
      if the uCancel of me is true then
        answer "Are you sure you want to cancel?" \
            with "Yes" or "No"
        if it is "Yes"
        then exit repeat
        else set the uCancel of me to false
      end if
    end if
  end repeat
  disable button "Cancel"
end mouseUp
Now we add a button "Cancel" and give it the following script:
on mouseUp
  set the uCancel of button "TightLoop" to true
end mouseUp
And presto! Not only does the screen redraw, but we now allow the user to stop the time-consuming process in our tight loop. Of course you'll have to add your logic to 'revert' any changes you've made in the process, but the above provides you with a skeleton script for handling this sort of situation.
As with all good things in life, 'wait with messages' comes at a price: as the user can now click your button twice, or trigger other scripts, it is very important to disable those parts of your user interface that shouldn't be executed 'concurrently' - my favourite method is to switch to a 'limited' environment, disabling all controls, displaying a blended white overlay over them as well as the 'Cancel' button making it the only enabled control. After the loop, the stack returns to the 'unlimited' environment, hiding the overlay and enabling the controls.
Some of you may wonder what happens when a script issues 'wait 1 second with messages' and the user clicks on another button: the other button's script is executed first, and then the engine checks if the wait timeout has passed, and resumes the original script. This means that if your other button script takes 5 seconds to complete, your first button script will remain suspended - the revEngine is not multi-threaded. But with a little planning, you can provide a much better user experience.
Saturday, November 14, 2009
Some time for reflection?
What do you do when you have two weeks off, after working hard for months to meet deadlines and ship a new module on time and per specification, with as only interruption: going to the RunRevLive'09 conference and doing three presentations? Well, I'm glad you asked - I started by catching up on sleep and doing the couch potato thing, watching Star Trek Enterprise season 3.
But along came the release of version 4.0 of the revPlatform, with the highly anticipated revWeb browser plug-in. A-ha, that means it's experiment time! So I sat down and made a little demo revlet, using nothing but graphics, gradients and a few lines of code to demonstrate one way of faking a reflection while playing a simple animation of three circles.

If you don't have the revWeb plug-in installed yet, get it here. Then open a new browser window to run the demo here. Click the 'Start' button to let the three circles roam around. I've included a link for you to download the original stack; if you don't yet have a copy of revMedia 4.0, you can download it here for free.
I'm sure the resident animation and graphics revGurus Ben Beaumont, Malte Brill or Scott Rossi could make it look so much better and smoother, but it's the result of playing around for about an hour, and I'm quite pleased with what I put together, given that my multimedia skills are virtually limited to stick figures.
The beauty of the revPlatform is its elegant language and extreme productivity. And now you can take revMedia for free and start creating revlets - no need to learn Flash ActionScript or JavaScript. Who can resist that?
But along came the release of version 4.0 of the revPlatform, with the highly anticipated revWeb browser plug-in. A-ha, that means it's experiment time! So I sat down and made a little demo revlet, using nothing but graphics, gradients and a few lines of code to demonstrate one way of faking a reflection while playing a simple animation of three circles.

If you don't have the revWeb plug-in installed yet, get it here. Then open a new browser window to run the demo here. Click the 'Start' button to let the three circles roam around. I've included a link for you to download the original stack; if you don't yet have a copy of revMedia 4.0, you can download it here for free.
I'm sure the resident animation and graphics revGurus Ben Beaumont, Malte Brill or Scott Rossi could make it look so much better and smoother, but it's the result of playing around for about an hour, and I'm quite pleased with what I put together, given that my multimedia skills are virtually limited to stick figures.
The beauty of the revPlatform is its elegant language and extreme productivity. And now you can take revMedia for free and start creating revlets - no need to learn Flash ActionScript or JavaScript. Who can resist that?
Sunday, October 25, 2009
Revolution, Snow Leopard and AppleEvent handlers
As you know, Macs have always sported a rather different operating system - in fact, MacOSX is quite good at hiding its powerful UNIX underpinnings from the average user, while still offering its full power to the more advanced computer user. But tossing out the old brittle 'cooperative multi-tasking' MacOS Classic, and swapping in the modern, robust NeXtStep with a new coat of paint, required that the Apple developers came up with a whole compatibility layer, named Carbon.
And one of the things that Carbon brought with it, was the system of Apple Events - added in System 7.0, this new type of event allowed Mac applicatiosn to talk to one another. Later, these Apple Events formed the underpinning of AppleScript, the system-wide scripting mechanism that is widely used for automating processes (and in turn, underpins the Automator tasks that allow you to point-and-click automation workflows in MacOSX).
What exactly is an Apple Event? An AppleEvent has a generic Class and Id, as well as associated data - and our rev stacks can handle these events by implementing an 'appleEvent' handler in our (stack) script. Alright, but why should I care as revDeveloper? Because if you want to write a decent Mac application, you had better implement the 'core' events. These are apple events of class 'aevt' and have an id of 'oapp' (open application), 'odoc' (open document), 'pdoc' (print document) or 'quit' (exit application).
Now, the revEngine is kind enough to handle the 'oapp' and 'quit' events for us, translating them into built-in events for us to handle, So we can concentrate on 'odoc' and 'pdoc' - and in fact, we only need to bother with these if we have some sort of 'editor' application. Of course, the Quartam Reports Layout Builder is exactly such an application. So I implemented a simple handler in my stack:
However, with the release of Snow Leopard, the format of the associated data appears to have changed rather dramatically. In previous releases, we would get a file path that we could use directly in file processing. For instance, your 'OpenFile' handler could look something like this:
For Snow Leopard, the good engineers at Apple have decided to change the format and where a file path from an 'odoc' event used to look something like "/My Big Project/Layouts/My First Layout.qrl", it now looks something like "file://localhost/My%20Big%20Project/Layouts/My%20First%20Layout.qrl" - presumabl, they're paving the way for other protocls than "file://" in the future, but this change has left our apps in the dust. I'm sure they were kind enough to update the Cocoa framework to translate this automatically, but what about us who don't drink the Objective-C Kool-Aid?
Well, the '%20' substitute for the space character, clued me in that there was some sort of URL encoding going on. So after a bit of fiddling, I came up with the following workaround for this prickly problem:
Splitting off the NormalizedPath function means I can reuse it for the 'pdoc' Apple Event, if I ever were to support that. Plus, I can now add that to my 'generic' library that I share among all my applications. Anyway, I hope this blog post is of help to some fellow revDeveloper baffled by this problem.
And one of the things that Carbon brought with it, was the system of Apple Events - added in System 7.0, this new type of event allowed Mac applicatiosn to talk to one another. Later, these Apple Events formed the underpinning of AppleScript, the system-wide scripting mechanism that is widely used for automating processes (and in turn, underpins the Automator tasks that allow you to point-and-click automation workflows in MacOSX).
What exactly is an Apple Event? An AppleEvent has a generic Class and Id, as well as associated data - and our rev stacks can handle these events by implementing an 'appleEvent' handler in our (stack) script. Alright, but why should I care as revDeveloper? Because if you want to write a decent Mac application, you had better implement the 'core' events. These are apple events of class 'aevt' and have an id of 'oapp' (open application), 'odoc' (open document), 'pdoc' (print document) or 'quit' (exit application).
Now, the revEngine is kind enough to handle the 'oapp' and 'quit' events for us, translating them into built-in events for us to handle, So we can concentrate on 'odoc' and 'pdoc' - and in fact, we only need to bother with these if we have some sort of 'editor' application. Of course, the Quartam Reports Layout Builder is exactly such an application. So I implemented a simple handler in my stack:
on appleEvent pClass, pId
  if pClass is "aevt" and pId is "odoc" then
    -- get the associated data
    request appleEvent data
    put it into tFilePath
    -- now handle opening the file somewhere else
    OpenFile tFilePath
  else
    -- let the revEngine handle other events
    pass appleEvent
  end if
end appleEvent
However, with the release of Snow Leopard, the format of the associated data appears to have changed rather dramatically. In previous releases, we would get a file path that we could use directly in file processing. For instance, your 'OpenFile' handler could look something like this:
on OpenFile pFilePath
  put URL ("binfile:" & pFilePath into tBinaryData
  -- go ahead and parse the content of the file
end OpenFile
For Snow Leopard, the good engineers at Apple have decided to change the format and where a file path from an 'odoc' event used to look something like "/My Big Project/Layouts/My First Layout.qrl", it now looks something like "file://localhost/My%20Big%20Project/Layouts/My%20First%20Layout.qrl" - presumabl, they're paving the way for other protocls than "file://" in the future, but this change has left our apps in the dust. I'm sure they were kind enough to update the Cocoa framework to translate this automatically, but what about us who don't drink the Objective-C Kool-Aid?
Well, the '%20' substitute for the space character, clued me in that there was some sort of URL encoding going on. So after a bit of fiddling, I came up with the following workaround for this prickly problem:
on appleEvent pCLass, pId
  if pClass is "aevt" and pId is "odoc" then
    -- get the associated data
    request appleEvent data
    put NormalizedPath(it) into tFilePath
    -- now handle opening the file somewhere else
    OpenFile tFilePath
  else
    -- let the revEngine handle other events
    pass appleEvent
  end if
end appleEvent

function NormalizedPath pFilePath
  put pFilePath into tNormalizedPath
  -- workaround change in Snow Leopard
  if char 1 to 7 of pFilePath is "file://" then
    set the itemDelimiter to slash
    delete item 1 to 3 of pFilePath -- remove "file://localhost" from front
    repeat for each item pFilePart in pFilePath
      put slash & urlDecode(tFilePart) after tNormalizedPath
    end repeat
  end if
  return tNormalizedPath
end NormalizedPath
Splitting off the NormalizedPath function means I can reuse it for the 'pdoc' Apple Event, if I ever were to support that. Plus, I can now add that to my 'generic' library that I share among all my applications. Anyway, I hope this blog post is of help to some fellow revDeveloper baffled by this problem.
Monday, October 19, 2009
Repeat loops, dialog boxes and aborting
It's one of those things that happen to all revolution developers at one point: you have written a repeat loop, inserted some 'answer' dialogs to figure out the problem, only to discover you're stuck and can't abort the loop because the dialog box is in the way. The only way out is killing the process, which has as downside that you've lost all changes to your stack ince the last Save.
After you've been bitten once, you'll probably adopt the habit of inserting an escape plan in your loops. At the same time, you ought to prevent problems in your shipping code with these escape routes, but more on that later - a first escape route may look something like this:
The cantAbort property of a stack determines whether or not you can abort in the first place (something which you really ought to turn on in standalones) and there's a checkbox on the stack inspector so it's quite convenient.
Another option is to move that block of code into a separate handler at the stack level
and then add a call to that handler in your loop
The downside of the second approach is that any cleanup code that comes after the repeat won't be called. Of course you can also rely on try-throw-catch exception handling, but some people find this awkward.
So just for completion, here's how you'd allow escape with cleanup via exception handling; first change the CheckForAbort handler to
and then modify the script with the loop so that it resembles the following
Hopefully, this will be of use to you at one point or another. Make sure to check out these entries in the documentation for more information about aborting running scripts: cantAbort stack property, allowInterrupts global property, interrupt function and of course the try-throw-catch triade for exception handling. Use them wisely, and provide your users with a safer envronment to work in...
After you've been bitten once, you'll probably adopt the habit of inserting an escape plan in your loops. At the same time, you ought to prevent problems in your shipping code with these escape routes, but more on that later - a first escape route may look something like this:
repeat forever
  add 1 to theCounter
  answer theCounter
  -- next block allows escape
  if the cantAbort of this stack is false and the shiftKey is down then
    answer "Are you sure you want to exit the loop after running" && theCounter && "times?" with "Continue" or "Exit"
    if it is "Exit" then exit repeat
  end if
end repeat
The cantAbort property of a stack determines whether or not you can abort in the first place (something which you really ought to turn on in standalones) and there's a checkbox on the stack inspector so it's quite convenient.
Another option is to move that block of code into a separate handler at the stack level
on CheckForAbort pCounter
  if the cantAbort of this stack is false and the shiftKey is down then
    answer "Are you sure you want to abort execution of" && pInfo && "?" with "Continue" or "Exit"
    if it is "Exit" then exit to top
  end if
end CheckForAbort
and then add a call to that handler in your loop
repeat forever
  add 1 to theCounter
  answer theCounter
  CheckForAbort "TightLoop-" & theCounter
end repeat
The downside of the second approach is that any cleanup code that comes after the repeat won't be called. Of course you can also rely on try-throw-catch exception handling, but some people find this awkward.
So just for completion, here's how you'd allow escape with cleanup via exception handling; first change the CheckForAbort handler to
on CheckForAbort pInfo
  if the cantAbort of this stack is false and the shiftKey is down then
    answer "Are you sure you want to abort execution of" && pInfo && "?" with "Continue" or "Exit"
    if it is "Exit" then throw "Aborting execution of" && pInfo
  end if
end CheckForAbort
and then modify the script with the loop so that it resembles the following
try
  repeat forever
    add 1 to theCounter
    answer theCounter
    CheckForAbort "TightLoop-" & theCounter
  end repeat
catch tError
  answer error tError
finally
  -- do your cleanup here
  --> it will be called whether or not something throws an error
end try
Hopefully, this will be of use to you at one point or another. Make sure to check out these entries in the documentation for more information about aborting running scripts: cantAbort stack property, allowInterrupts global property, interrupt function and of course the try-throw-catch triade for exception handling. Use them wisely, and provide your users with a safer envronment to work in...
Sunday, October 4, 2009
Quartam Reports Webinar
As announced in the revUp 79 newsletter for revAfficionados, I'll be hosting a webinar on Quartam Reports, sponsored by the revSelect third-party extension program.
What can you expect to see?
- a few slides to explain how Quartam Reports can help you revDevelopers
- some examples of what you can achieve with Quartam Reports
- a brisk walkthrough creating a report for an example application
- time for questions and answers at the end
Click here to register and join us on October 6, 2009 at 7pm BST (8pm for most of Europe, 2pm Eastern for US viewers) - if you can't make it, you can always watch the recording a few days later. I'll post the download link once available.
What can you expect to see?
- a few slides to explain how Quartam Reports can help you revDevelopers
- some examples of what you can achieve with Quartam Reports
- a brisk walkthrough creating a report for an example application
- time for questions and answers at the end
Click here to register and join us on October 6, 2009 at 7pm BST (8pm for most of Europe, 2pm Eastern for US viewers) - if you can't make it, you can always watch the recording a few days later. I'll post the download link once available.
RunRevLive'09 Slides and Example Code
Just a month ago, RunRev held their successful RunRevLive'09 conference in Edinburgh.
As I've blogged before, I had the honour of presenting on three topics:
- 'Working with Java Classes'
- 'Desktop Databases with SQLite'
- 'Basic Reports & Output'
By popular demand, I've made the slides and example code for these sessions available in the Downloads section on the quartam.com website.
As I've blogged before, I had the honour of presenting on three topics:
- 'Working with Java Classes'
- 'Desktop Databases with SQLite'
- 'Basic Reports & Output'
By popular demand, I've made the slides and example code for these sessions available in the Downloads section on the quartam.com website.
Saturday, August 8, 2009
Presenting at RunRevLive'09
Edinburgh is the hometown of Runtime Revolution Ltd, the guys behind Revolution - and the scene of this year's RunRevLive conference. After the huge success of last year's conference in Las Vegas, it has the makings of yet aother groundbreaking conference, focusing on the revWeb browser plug-in, the new product line-up (revMedia for free, revStudio and revEnterprise for extremely affordable prices) and the unveiling of revServer (the engine behind On-Rev).
When the crew asked me to present at this conference, I jumped at the chance to not just be there as one of the many attendees, but share my experiences with the rest of the community - as I have done for years on the use-revolution mailing list and the official forums. After submitting proposals, I got the green light for three presentations: 'Working with Java Classes', 'Desktop Databases with SQLite' and 'Basic Reports & Output.'
'Working with Java Classes' (Day Zero) delves into the various ways Revolution applications can interact with Java classes: a half-hour rollercoaster ride along shell commands, process comunication, socket communication, web services, message queues and externals.
'Desktop Databases with SQLite' (Day One) will take you on a trip through a straightforward desktop application where the data is stored in an SQLite database. By the end, you should have a pretty good idea how to quickly develop a database front-end with revStudio or revEnterprise.
'Basic Reports & Output' (Day One) will use the same desktop application to demonstrate various ways of reporting: generating HTML and RTF documents, using Excel as reporting vehicle in multiple ways, sending stuff to the printer using the built-in commands, and (obviously) how you ca make your life easier with Quartam Reports and Quartam PDF Library for Revolution.
I'm looking forward to seeing you all at the conference, both familiar and new faces - there are few things better than finally meeting someone you've only known through exchanging emails, or going for drinks with someone you only get to see via these get-togethers. Plenty of good stuff, and no jet-lag for me as it's only a hop accross the channel :-)
When the crew asked me to present at this conference, I jumped at the chance to not just be there as one of the many attendees, but share my experiences with the rest of the community - as I have done for years on the use-revolution mailing list and the official forums. After submitting proposals, I got the green light for three presentations: 'Working with Java Classes', 'Desktop Databases with SQLite' and 'Basic Reports & Output.'
'Working with Java Classes' (Day Zero) delves into the various ways Revolution applications can interact with Java classes: a half-hour rollercoaster ride along shell commands, process comunication, socket communication, web services, message queues and externals.
'Desktop Databases with SQLite' (Day One) will take you on a trip through a straightforward desktop application where the data is stored in an SQLite database. By the end, you should have a pretty good idea how to quickly develop a database front-end with revStudio or revEnterprise.
'Basic Reports & Output' (Day One) will use the same desktop application to demonstrate various ways of reporting: generating HTML and RTF documents, using Excel as reporting vehicle in multiple ways, sending stuff to the printer using the built-in commands, and (obviously) how you ca make your life easier with Quartam Reports and Quartam PDF Library for Revolution.
I'm looking forward to seeing you all at the conference, both familiar and new faces - there are few things better than finally meeting someone you've only known through exchanging emails, or going for drinks with someone you only get to see via these get-togethers. Plenty of good stuff, and no jet-lag for me as it's only a hop accross the channel :-)
Wednesday, July 22, 2009
revMedia 4 - a Revolution on the Web
First announced last year at the runrevlive'08 conference in Las Vegas, the RunRev team has unveiled the first public alpha of their revWeb browser plug-in - the easiest way to create RIAs (Rich Internet Applications) for use on Mac, Windows and Linux. [click here to read the press release]
And to top it off, the revMedia toolkit will be absolutely free. No longer do you have to cobble together an AJAX-based RIA using JavaScript in the browser and PHP or something else on the back-end; you can stop wondering why the Flash designer tool just doesn't think like you and me; gone are the days of pondering if Microsoft is going to cripple Silverlight on other platforms; and you don't even have to place bets on whether or not JavaFX is really such a splendid idea from server-focused Sun (the beleaguered company that is soon-to-be-gobbled-up-by-Oracle, if you're not keeping tabs on that platform).
This is it: start of with revMedia, and deploy to the web; move up to revStudio when you need to build desktop applications that are native for each platform and don't require a 50 MB runtime download; and move up again to revEnterprise when you need Oracle or SSL; and when you need easy hosting that uses the exact same language to create dynamic websites, On-Rev is your platform of choice.
To be frank, I've always expressed my dismay regarding browsers as a deployment platform for 'real' business applications. Maybe if XUL had taken off, building a feature-rich application running inside a browser would have made more sense. But including miles and miles of JavaScript to try and mimick a desktop app, that was clearly an impressive workaround, but still a hobbled experience.
So I'm glad to see that the Revolution has hit the web, and we'll see a renaissance of good ol' HyperCard: easy to program and easy to run. Keep up the good work, RunRev team!
And to top it off, the revMedia toolkit will be absolutely free. No longer do you have to cobble together an AJAX-based RIA using JavaScript in the browser and PHP or something else on the back-end; you can stop wondering why the Flash designer tool just doesn't think like you and me; gone are the days of pondering if Microsoft is going to cripple Silverlight on other platforms; and you don't even have to place bets on whether or not JavaFX is really such a splendid idea from server-focused Sun (the beleaguered company that is soon-to-be-gobbled-up-by-Oracle, if you're not keeping tabs on that platform).
This is it: start of with revMedia, and deploy to the web; move up to revStudio when you need to build desktop applications that are native for each platform and don't require a 50 MB runtime download; and move up again to revEnterprise when you need Oracle or SSL; and when you need easy hosting that uses the exact same language to create dynamic websites, On-Rev is your platform of choice.
To be frank, I've always expressed my dismay regarding browsers as a deployment platform for 'real' business applications. Maybe if XUL had taken off, building a feature-rich application running inside a browser would have made more sense. But including miles and miles of JavaScript to try and mimick a desktop app, that was clearly an impressive workaround, but still a hobbled experience.
So I'm glad to see that the Revolution has hit the web, and we'll see a renaissance of good ol' HyperCard: easy to program and easy to run. Keep up the good work, RunRev team!
Thursday, April 16, 2009
Vive la Revolution!
It has been a busy month of April at the Runtime Revolution HQ - last week we witnessed the release of Revolution 3.5, with its data grid and behavior scripting, and this week they've announced the On-Rev web hosting initiative.
Since the unveiling of the RunRev web strategy at the runrevlive '08 conference, last year in Las Vegas, Rev-afficionados around the globe have been eagerly anticipating the day where they can do away with the mix-and-match (or should that be 'mismatch'?) of technologies needed to build modern, Internet-enabled applications.
With customers and end-users requesting applications that work on desktops and web-browsers alike, developers have been forced to use combinations of JavaScript, Flash, .NET, Java and a myriad of frameworks to deliver solutions where not all features might have been fully implemented accross the different client interfaces.
With the Revolution of the Future, developers will finally be able to build those same solutions with a comprehensive technology stack based on one language, and have it work as a desktop application or in a web browser, backed by business logic with database access on the server-side.
Java promised us this 15 years ago, and then kinda-sorta forgot about this promise. Granted, Java SE 6u10 finally fixed the Applets experience, and Java EE 5 definitely simplified server-side development; but in their panic to provide an alternative to Flash, they produced JavaFX with a new scripting language that doesn't even work like Java.
In short, I think the RunRev team has a winner on their hands - and I am definitely looking forward to putting these new Revolution technologies to good use.
Since the unveiling of the RunRev web strategy at the runrevlive '08 conference, last year in Las Vegas, Rev-afficionados around the globe have been eagerly anticipating the day where they can do away with the mix-and-match (or should that be 'mismatch'?) of technologies needed to build modern, Internet-enabled applications.
With customers and end-users requesting applications that work on desktops and web-browsers alike, developers have been forced to use combinations of JavaScript, Flash, .NET, Java and a myriad of frameworks to deliver solutions where not all features might have been fully implemented accross the different client interfaces.
With the Revolution of the Future, developers will finally be able to build those same solutions with a comprehensive technology stack based on one language, and have it work as a desktop application or in a web browser, backed by business logic with database access on the server-side.
Java promised us this 15 years ago, and then kinda-sorta forgot about this promise. Granted, Java SE 6u10 finally fixed the Applets experience, and Java EE 5 definitely simplified server-side development; but in their panic to provide an alternative to Flash, they produced JavaFX with a new scripting language that doesn't even work like Java.
In short, I think the RunRev team has a winner on their hands - and I am definitely looking forward to putting these new Revolution technologies to good use.
Thursday, March 26, 2009
Behavior on the Grid
Today, the good people of Runtime Revolution Ltd. presented an impressive webinar, showcasing the brand new Data Grid control that is a salivating new feature of Revolution 3.5 - in fact, this new control has given us a lot more than what most people would want from a table control. You can setup everything from a straightforward table with multiple alignments, to a spectacular form with dynamically resizing rows containing arbitrary controls with judicious use of template groups.
This crown jewel was developed using the other new big technological addition to Revolution: behaviors. This allows you to write a script once and apply it to several other controls at once - and when you update the original behavior script, all those controls adopt the change in behavior automatically.
Of course, if you're used to object-oriented programming, this sounds like simple inheritance. The xCard paradigm, pioneered over 20 years ago by Apple's HyperCard is traditionally object-based but not fully object-oriented; there's a limited set of built-in controls and you can 'specialize' these by adding a script.
Another typical OO design pattern, Chain of Responsibility, was the basis of the xCard message path, which allows developers to place handlers for events, command and function calls in a central place - if you needed to know where the event originated, you could use 'the target' property to work your magic from there.
Strictly speaking this was enough to build something like the Data Grid in the past, but the new 'behavior' feature makes it a lot easier. The 'me' object points to the 'target' rather than the button that contains the 'behavior' script - so we no longer have to subject ourselves to 'long id' shenanigans to make sure we're modifiying the right controls.
Experiments with the new 'behavior' scripting methods have me pondering how I can adopt this for all my Revolution projects and which controls I can rebuild and put together in a single library for reuse - and perhaps for others to use. Ah, if only there was a function to conjure a Time-Turner so I could do everything I want to do but fail to find the time for...
This crown jewel was developed using the other new big technological addition to Revolution: behaviors. This allows you to write a script once and apply it to several other controls at once - and when you update the original behavior script, all those controls adopt the change in behavior automatically.
Of course, if you're used to object-oriented programming, this sounds like simple inheritance. The xCard paradigm, pioneered over 20 years ago by Apple's HyperCard is traditionally object-based but not fully object-oriented; there's a limited set of built-in controls and you can 'specialize' these by adding a script.
Another typical OO design pattern, Chain of Responsibility, was the basis of the xCard message path, which allows developers to place handlers for events, command and function calls in a central place - if you needed to know where the event originated, you could use 'the target' property to work your magic from there.
Strictly speaking this was enough to build something like the Data Grid in the past, but the new 'behavior' feature makes it a lot easier. The 'me' object points to the 'target' rather than the button that contains the 'behavior' script - so we no longer have to subject ourselves to 'long id' shenanigans to make sure we're modifiying the right controls.
Experiments with the new 'behavior' scripting methods have me pondering how I can adopt this for all my Revolution projects and which controls I can rebuild and put together in a single library for reuse - and perhaps for others to use. Ah, if only there was a function to conjure a Time-Turner so I could do everything I want to do but fail to find the time for...
Saturday, January 3, 2009
Revolution newsletter articles
One of the best things about Revolution is its strong-knit community - whether it's on the mailing list or on the forums, when you post a question there's bound to come an answer from one of the many users that have faced a similar problem. And soon enough, the newbies come of age and start replying to questions as well. This way, the good advice keeps getting spread over an ever-growing group of users.
Another important resource is the Revolution newsletter, where both the company's engineers and a variety of writers from the uer community share their knowledge and their solutions for challenges encountered while developing their applications. I just concluded a series of articles on using the 'merge' function, which got good reader feedback.
The 'merge' function is one of those extremely helpful weapons in the Revolution armoury, which every developer should know about and use, as it has many applications and can save you a lot of time. It goes through a text, and evaluates expressions that you've put in between [[...]] double square brackets, and executes statements that you've put in between <?...?> processing instruction brackets; and when it's done, it hands you back the end result.
This makes it an ideal tool for assembling HTML pages, RTF documents, XML files and other text-based file formats. But you can also use it as a preprocessor for templates, ranging from SQL queries to VBScript or AppleScript. One particular combination is to use Microsoft Word as a reporting system in two ways: merging an RTF template into a document, and then merging the necessary script to automate Word and print the document for you.
Here are links to the individual articles:
- The Power of Merge (revUp | Issue 55 | August 18th, 2008)
- The Word of Merge - part 1 (revUp | Issue 61 | November 20th, 2008)
- The Word of Merge - part 2 (revUp | Issue 62 | December 22nd, 2008)
Enjoy the articles and Revolution! And if you still have to make a New Year's resolution, make it something along the lines of 'I want to learn' - as education is the only path that leads to prosperity...
Another important resource is the Revolution newsletter, where both the company's engineers and a variety of writers from the uer community share their knowledge and their solutions for challenges encountered while developing their applications. I just concluded a series of articles on using the 'merge' function, which got good reader feedback.
The 'merge' function is one of those extremely helpful weapons in the Revolution armoury, which every developer should know about and use, as it has many applications and can save you a lot of time. It goes through a text, and evaluates expressions that you've put in between [[...]] double square brackets, and executes statements that you've put in between <?...?> processing instruction brackets; and when it's done, it hands you back the end result.
This makes it an ideal tool for assembling HTML pages, RTF documents, XML files and other text-based file formats. But you can also use it as a preprocessor for templates, ranging from SQL queries to VBScript or AppleScript. One particular combination is to use Microsoft Word as a reporting system in two ways: merging an RTF template into a document, and then merging the necessary script to automate Word and print the document for you.
Here are links to the individual articles:
- The Power of Merge (revUp | Issue 55 | August 18th, 2008)
- The Word of Merge - part 1 (revUp | Issue 61 | November 20th, 2008)
- The Word of Merge - part 2 (revUp | Issue 62 | December 22nd, 2008)
Enjoy the articles and Revolution! And if you still have to make a New Year's resolution, make it something along the lines of 'I want to learn' - as education is the only path that leads to prosperity...
Subscribe to:
Posts (Atom)