How far did we get last time?
- A background gradient behind the image
- An image with a 4px white border
- A drop shadow below the image
And our custom control group has a behavior button script to handle resizing and toggling the display of the drop shadow. Now we come to the tricky part:
- A sheen over the image
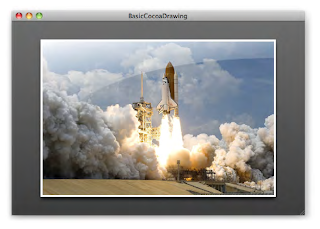
Perhaps it's best to explain what a 'sheen' is: a visual effect that displays a glossy white overlay, clipped to a bezier curve, rendering the illusion of a light source in the upper-left corner of the image. Cute, but how does one implement it? Scott used a linear gradient (tilted slightly to enhance the illusion) to fill a path determined by the edges of the image and a bezier path. As LiveCode doesn't have bezier curves on offer, it was time to think a bit differently.
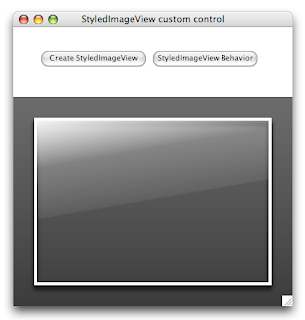
Let's start with the gradient. Linear gradients are not too difficult to implement; but we have to give it the right angle. Trigonometry has never been my best subject, but I remembered anough to figure out how to rotate the gradient by 10 degrees. And the LiveCode documentation came with example code for converting degrees to radians.
Here's an update for the "Create" button:
on mouseUp
   local tGroup
   CreateCustomControlGroup "StyledImageView", tGroup
   CreateBackgroundGraphic tGroup
   CreateViewImage tGroup
   CreateSheen tGroup
   set the behavior of tGroup to the long id of button "StyledImageView Behavior"
   set the showShadow of tGroup to true
end mouseUp

private command CreateCustomControlGroup pGroupName, @rGroupId
   -- same as before, omitting for brevity
end CreateCustomControlGroup

private command CreateBackgroundGraphic pGroup
   -- same as before, omitting for brevity
end CreateBackgroundGraphic

private command CreateViewImage pGroup
   -- same as before, omitting for brevity
end CreateViewImage

private command CreateSheen pGroup
   CreateSheenGradient pGroup
end CreateSheen

private command CreateSheenGradient pGroup
   reset the templateGraphic
   set the style of the templateGraphic to "Rectangle"
   set the rectangle of the templateGraphic to 30,130,370,310
   set the lineSize of the templateGraphic to 0
   set the opaque of the templateGraphic to true
   set the fillGradient["type"] of the templateGraphic to "linear"
   set the fillGradient["from"] of the templateGraphic to 30,130
   set the fillGradient["to"] of the templateGraphic to 61,307
   set the fillGradient["via"] of the templateGraphic to 207,99
   set the fillGradient["ramp"] of the templateGraphic to \
         "0.00000,255,255,255" & return & \
         "0.40000,255,255,255,51" & return & \
         "0.79999,255,255,255,13" & return & \
         "0.80000,255,255,255,0" & return & \
         "1.00000,255,255,255,0"
   create graphic "GradientGraphic" in pGroup
   reset the templateGraphic
end CreateSheenGradient
Delete the existing custom control group and hit the button again. You should see the gradient graphic on top of the image control.

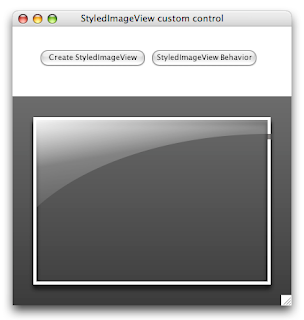
We'll also have to update the resizing logic in our behavior script, but I'll leave that for later. Our next challenge is the bezier curve, and how we can construct a path to clip the gradient to it. And then it struck me: we can achieve the same effect (in this case) by creating an oval graphic and then clip that out of the gradient graphic.
Inspiration came from an old blog post by RunRev's Mark Waddingham. The original blog is no onger on the web, but thanks to the Wayback Machine internet archive, I was able to dig up this snapshot. Here's the gist: you take two control, comlbine them into a group, and then use different blend modes for the group and graphics to achieve soft clipping.
The only difference: Mark talks about clipping something down to a graphic shape, whereas I wanted to clip a graphic shape out of the original shape. But as it turns out to, this was as easy as picking a different blend mode for the clipping graphic. So let's use this knowledge to once more update the "Create" button:
on mouseUp
   local tGroup
   CreateCustomControlGroup "StyledImageView", tGroup
   CreateBackgroundGraphic tGroup
   CreateViewImage tGroup
   CreateSheen tGroup
   set the behavior of tGroup to the long id of button "StyledImageView Behavior"
   set the showShadow of tGroup to true
end mouseUp

private command CreateCustomControlGroup pGroupName, @rGroupId
   -- same as before, omitting for brevity
end CreateCustomControlGroup

private command CreateBackgroundGraphic pGroup
   -- same as before, omitting for brevity
end CreateBackgroundGraphic

private command CreateViewImage pGroup
   -- same as before, omitting for brevity
end CreateViewImage

private command CreateSheen pGroup
   local tSheenGroup
   reset the templateGroup
   set the rectangle of the templateGroup to 30,130,370,310
   set the lockLocation of the templateGroup to true
   set the margins of the templateGroup to 0
   set the ink of the templateGroup to "blendSrcOver"
   create group "SheenGroup" in pGroup
   put it into tSheenGroup
   reset the templateGroup
   CreateSheenGradient tSheenGroup
   CreateSheenClipping tSheenGroup
end CreateSheen

private command CreateSheenGradient pGroup
   -- same as before, omitting for brevity
end CreateSheenGradient

private command CreateSheenClipping pGroup
   reset the templateGraphic
   set the style of the templateGraphic to "Oval"
   set the rectangle of the templateGraphic to 10,10,10,10
   set the ink of the templateGraphic to "blendDstOut"
   set the lineSize of the templateGraphic to 0
   set the opaque of the templateGraphic to true
   create graphic "ClippingGraphic" in pGroup
   set the rectangle of it to -21,154,761,586
   reset the templateGraphic
end CreateSheenClipping
Delete the existing custom control group and hit the button again.

Getting there - now we just need to extend the behavior script with the logic to properly resize these new parts:
## engine message handlers

on mouseDoubleUp
   -- same as before, omitting for brevity
end mouseDoubleUp

on resizeControl
   -- same as before, omitting for brevity
end resizeControl

## property setters and getters

setProp showShadow pShowShadowBoolean
   -- same as before, omitting for brevity
end showShadow

setProp showSheen pShowSheenBoolean
   set the visible of group "SheenGroup" of me to pShowSheenBoolean
end showSheen

getProp showSheen
   return the visible of group "SheenGroup" of me
end showSheen

setProp imageFileName pFileName
   -- same as before, omitting for brevity
end imageFileName

getProp imageFileName
   -- same as before, omitting for brevity
end imageFileName

## private commands and functions

private command SIV_ReshapeControl
   local tImageRectangle
   SIV_DetermineImageRectangle tImageRectangle
   SIV_ReshapeBackground
   SIV_ReshapeImage tImageRectangle
   SIV_ReshapeSheen tImageRectangle
end SIV_ReshapeControl

private command SIV_DetermineImageRectangle @rImageRectangle
   -- same as before, omitting for brevity
end SIV_DetermineImageRectangle

private command SIV_ReshapeBackground
   -- same as before, omitting for brevity
end SIV_ReshapeBackground

private command SIV_ReshapeImage pImageRectangle
   -- same as before, omitting for brevity
end SIV_ReshapeImage

private command SIV_ReshapeSheen pImageRectangle
   set the rectangle of group "SheenGroup" of me to pImageRectangle
   local tImageWidth, tImageHeight
   put (item 3 of pImageRectangle) - (item 1 of pImageRectangle) into tImageWidth
   put (item 4 of pImageRectangle) - (item 2 of pImageRectangle) into tImageHeight
   --> reshape the gradient rect
   local tGradientRectangle, tGradientHeight, tFromPoint, tToPoint, tViaPoint
   put pImageRectangle into tGradientRectangle
   put trunc(tImageHeight * 0.75) into tGradientHeight
   put ((item 2 of tGradientRectangle) + tGradientHeight) into item 4 of tGradientRectangle
   put   (item 1 of tGradientRectangle), \
         (item 2 of tGradientRectangle) \
         into tFromPoint
   put   ((item 1 of tGradientRectangle) + trunc(SIV_SinInDegrees(10) * tGradientHeight)), \
         ((item 2 of tGradientRectangle) + trunc(SIV_CosInDegrees(10) * tGradientHeight)) \
         into tToPoint
   put   ((item 1 of tGradientRectangle) + trunc(SIV_SinInDegrees(80) * tGradientHeight)), \
         ((item 2 of tGradientRectangle) - trunc(SIV_CosInDegrees(80) * tGradientHeight)) \
         into tViaPoint
   set the rectangle of graphic "GradientGraphic" of group "SheenGroup" of me to tGradientRectangle
   set the fillGradient["from"] of graphic "GradientGraphic" of group "SheenGroup" of me to tFromPoint
   set the fillGradient["to"] of graphic "GradientGraphic" of group "SheenGroup" of me to tToPoint
   set the fillGradient["via"] of graphic "GradientGraphic" of group "SheenGroup" of me to tViaPoint
   --> reshape the clipping oval
   local tClippingRectangle, tXRadius, tYRadius
   put trunc(tImageWidth * 1.15) into tXRadius
   put trunc(tImageHeight * 0.9) into tYRadius
   put   ((item 3 of pImageRectangle) - tXRadius), \
         ((item 4 of pImageRectangle) - tYRadius), \
         ((item 3 of pImageRectangle) + tXRadius), \
         ((item 4 of pImageRectangle) + tYRadius) \
         into tClippingRectangle
   set the rectangle of graphic "ClippingGraphic" of group "SheenGroup" of me to tClippingRectangle
end SIV_ReshapeSheen

private function SIV_SinInDegrees angleInDegrees
   return sin(angleInDegrees * pi / 180)
end SIV_SinInDegrees

private function SIV_CosInDegrees angleInDegrees
   return cos(angleInDegrees * pi / 180)
end SIV_CosInDegrees
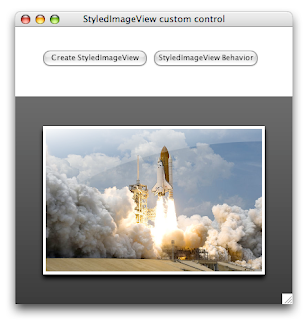
Delete the existing custom control group and hit the "Create" button again. Then double-click to select an image. I downloaded and selected the original image that Scott used - a public domain image from NASA.

I would say that this looks like the original StyledImageViewClass. Next time, we'll take this custom control a bit further, by turning it into a DropTool. Stay tuned...
No comments:
Post a Comment