Monday, July 26, 2010

BorderLayout example script

As you may know, I spend quite a bit of my time in Java, not merely building back-end systems with message queues and raw socket communication, but also creating user interfaces in Swing. One of the most compelling features of Swing is its system of LayoutManagers - and certainly the easiest-to-use is the BorderLayout. Today, I'm going to explain how you can mimic this type of layout handling in revTalk.

The principle of the BorderLayout is quite simple: it divides the window into 5 panels: North, East, South, West and Center. As a picture says more than a thousand words, here's what this layout generally looks like:
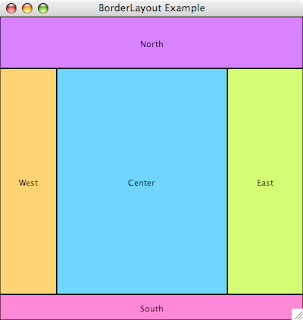


The North panel is a good place to store a toolbar, the South panel usually plays host for a status area, while the West panel may show an outline, and the East panel a property grid, leaving the Center for the actual content.

For this example, I chose the easy route, creating a single rectangle graphic for each panel. I also picked distinct colors so you can more easily see the effect of resizing the window once the pieces of the puzzle fall into place. And it turns out it isn't that much work to implement, as I set the card script to:


on resizeStack pNewWidth, pNewHeight
local tCenterHeight, tCenterWidth
--
lock screen
-- update the north and south panels
set the widthFromLeft of graphic "North" to pNewWidth
set the widthFromLeft of graphic "South" to pNewWidth
set the bottom of graphic "South" to pNewHeight
put the top of graphic "South" - \
the bottom of graphic "North" \
into tCenterHeight
-- update the west and east panels
set the heightFromTop of graphic "West" to \
tCenterHeight
set the heightFromTop of graphic "East" to \
tCenterHeight
set the right of graphic "East" to pNewWidth
put the left of graphic "East" - \
the right of graphic "West" \
into tCenterWidth
-- update the center panel
set the widthFromLeft of graphic "Center" to \
tCenterWidth
set the heightFromTop of graphic "Center" to \
tCenterHeight
--
unlock screen
pass resizeStack
end resizeStack

--> helper property setters

setProp widthFromLeft pNewWidth
local tRectangle
--
lock screen
put the rectangle of the target into tRectangle
put item 1 of tRectangle + pNewWidth \
into item 3 of tRectangle
set the rectangle of the target to tRectangle
unlock screen
end widthFromLeft

setProp heightFromTop pNewHeight
local tRectangle
--
lock screen
put the rectangle of the target into tRectangle
put item 2 of tRectangle + pNewHeight \
into item 4 of tRectangle
set the rectangle of the target to tRectangle
unlock screen
end heightFromTop


Let's see what is happening here. The script handles the resizeStack event, which has 4 parameters (new width, new height, old width, old height) of which we only use the first two.

As the North and South panels use up the entire width, I can simply set their width to the new width of the stack. However, setting the width of a control in revTalk works from the location of the control (which is the center, not the topleft).
So I use a fake helper property setter 'widthFromLeft' to update the rectangle of the control instead. Finally, we move the South panel to the bottom edge of the window, and calculate the distance between the top of the south panel and the bottom of the north panel, as this is the new height for our West, East and Center panels.

Armed with this information, I follow a similar path for the West and East panels, updating their height using a fake helper property setter 'heightFromTop', and moving the East panel to the right edge of the window, calculating the distance between the east and west panels to determine the new width of the Center panel. And now it is dead-easy to update the Center panel with the calculated width and height.

That's all there is to it! Admittedly, this example merely resizes 5 graphics, but you can extend this logic to groups, handling the resizeControl message in your group scripts to automatically update the layout of the group's contents.

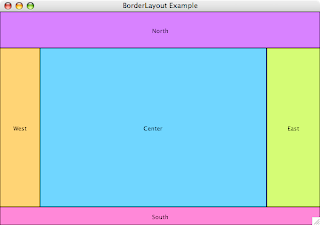
Here's what it looks like when stretched horizontally.


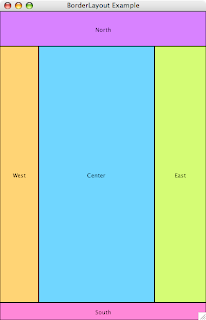
And here's what it looks like when stretched vertically.


Straightforward to implement with very little code. Next time, I'll add some resizers for the West and East panels.

Thursday, July 22, 2010

DataGrid Filter example - with sorting

The other day I posted an example of how you can add a filter to a DataGrid in Revolution. At the end of that blog post, I remarked how I had deliberately turned off column sorting. Fear not, it is straightforward to add support for this, again thanks to the DataGrid lessons available on the runrev.com website.

Just as a reminder, here's a screenshot of the example stack:


So what do we need to do to allow the user to click on the column header and apply the sort and filter at the same time? It's quite a simple bity of scripting, but before we get to that, you need to make some minor modifications to the datagrid columns.
- Switch to the 'pointer' tool, and select the datagrid, then open the Object Inspector, and switch to the 'Columns' panel
-> select the column 'index' and set its Sort by column type to 'Numeric'
-> select the column 'name' and make sure its Sort by column type is 'Text'

Now edit the script of the datagrid, and set it to:

local sOriginalData
local sIndexMap
local sFilter

setProp dgData pData
put pData into sOriginalData
RebuildMap
end dgData

getProp dgData
return sOriginalData
end dgData

setProp dgFilter pFilter
put pFilter into sFilter
RebuildMap
end dgFilter

getProp dgFilter
return sFilter
end dgFilter

--> datagrid callbacks

on GetDataForLine pLine, @pData
local tKey
-- retrieve the original line of data
put sIndexMap[pLine] into tKey
put sOriginalData[tKey] into pData
end GetDataForLine

on SortDataGridColumn pColumn
SortMap pColumn
HiliteAndStoreSortByColumn pColumn
dispatch "RefreshList" to me
end SortDataGridColumn

--> private commands and functions

private command RebuildMap
local tKeys, tKey, tIndex
put empty into sIndexMap
put 0 into tIndex
put the keys of sOriginalData into tKeys
sort tKeys numeric
repeat for each line tKey in tKeys
if sFilter is empty \
or sOriginalData[tKey]["name"] contains sFilter \
then
add 1 to tIndex
put tKey into sIndexMap[tIndex]
end if
end repeat
set the dgNumberOfRecords of me to tIndex
SortMap
dispatch "ResetList" to me
end RebuildMap

private command SortMap pColumn
local tSortDirection, tSortType, tSortCaseSensitive
local tSortCommand
local tKeys, tKey, tNewIndex, tNewIndexMap
-- works whether a column is specified or not
if pColumn is empty then
-- find the current sort column
put the dgProps["sort by column"] of me into pColumn
if pColumn is empty then
exit SortMap
end if
end if
-- assemble and do the sort command
put the dgColumnSortDirection[pColumn] of me \
into tSortDirection
put the dgColumnSortType[pColumn] of me \
into tSortType
put the dgColumnSortCaseSensitive[pColumn] of me \
into tSortCaseSensitive
put "sort lines of tKeys" && tSortDirection \
into tSortCommand
switch tSortType
case "numeric"
put " numeric" after tSortCommand
break
case "international"
put " international" after tSortCommand
break
case "datetime"
case "system datetime"'
put " dateTime" after tSortCommand
break
end switch
put " by ColumnValueForLine(pColumn, each)" \
after tSortCommand
set the caseSensitive to \
(tSortCaseSensitive is true)
set the useSystemDate to \
(tSortType is "system datetime")
put the keys of sIndexMap into tKeys
do tSortCommand
-- rebuild the index map
put 0 into tNewIndex
repeat for each line tKey in tKeys
add 1 to tNewIndex
put sIndexMap[tKey] into \
tNewIndexMap[tNewIndex]
end repeat
put tNewIndexMap into sIndexMap
end SortMap

private function ColumnValueForLine pColumn, pLine
local tKey
-- retrieve the original line of data
put sIndexMap[pLine] into tKey
return sOriginalData[tKey][pColumn]
end ColumnValueForLine

What's changed in comparison to the last implementation? Well, the bulk of the necessary work is done in the new private command SortMap, which reads the column sort properties and uses a custom sort function to get the filtered lines in the right order on the basis of the column value in the original lines of data. Then it builds a new IndexMap to replace the old one, and the regular refresh routines of the datagrid will "just work."

So what happens when we sort the data descending on the name, without applying a filter?


Looking good - does the filter still work? Let's type 'url' into the filter field.


You may have noticed that I also added getProp-handlers for dgData and dgFilter, making the above script easily reusable. With just a bit of lateral thinking and coding, you too can build just about anything, thanks to Revolution.

Monday, July 19, 2010

DataGrid Filter example

One of the powerful additions to Revolution 3.5 is the DataGrid - a custom control group that allows you to display any type of data with astonishing flexibility. Recently, I had to add filtering capabilities to a data grid for one of my projects. In this post, I will explain how I accomplished it, thanks to the DataGrid lessons available on the runrev.com website.

Here's a screenshot of the example stack:


Execute the following steps, if you want to follow along:
- Create a new stack
- Drag a button to the topleft of the card and set its name to "Fill"
- Drag a text field to the topright of the card
- Drag a label field next to the text field and set its content to "Filter:"
- Drag a data grid onto the card and configure it using the Object Inspector
-> In the 'Basic Properties' panel, turn off the checkbox "Allow Text Editing"
-> Switch to the 'Columns' panel, and add 2 columns "index" and "name"
-> Edit the script of the DataGrid, and set it to the following:

local sOriginalData
local sIndexMap
local sFilter

setProp dgData pData
put pData into sOriginalData
RebuildMap
end dgData

setProp dgFilter pFilter
put pFilter into sFilter
RebuildMap
end dgFilter

private command RebuildMap
local tKeys, tKey, tIndex
put 0 into tIndex
put the keys of sOriginalData into tKeys
sort tKeys numeric
repeat for each line tKey in tKeys
if sFilter is empty \
or sFilter is in sOriginalData[tKey]["name"] \
then
add 1 to tIndex
put tKey into sIndexMap[tIndex]
end if
end repeat
set the dgNumberOfRecords of me to tIndex
dispatch "ResetList" to me
end RebuildMap

on GetDataForLine pLine, @pData
local tKey
put sIndexMap[pLine] into tKey
put sOriginalData[tKey] into pData
end GetDataForLine

on SortDataGridColumn pColumn
-- prevent column sorting
end SortDataGridColumn

The above data grid script will take care of filtering the data. Now it's just a matter of wiring up the text field.
-> Edit the script of the text field and set it to the following:

local sUpdateMsg

on keyUp pKey
ScheduleUpdate
pass keyUp
end keyUp

on deleteKey
ScheduleUpdate
pass deleteKey
end deleteKey

on backspaceKey
ScheduleUpdate
pass backspaceKey
end backspaceKey

on pasteKey
ScheduleUpdate
pass pasteKey
end pasteKey

on cutKey
ScheduleUpdate
pass cutKey
end cutKey

command ScheduleUpdate
if sUpdateMsg is empty then
send "UpdateFilter" to me in 100 milliseconds
put the result into sUpdateMsg
end if
end ScheduleUpdate

on UpdateFilter
set the dgFilter of group "DataGrid 1" \
to the text of me
put empty into sUpdateMsg
end UpdateFilter

By trapping the different key events, we can update the data grid filter as we go along. Note that I used the ScheduleUpdate helper command to try and minimize the number of refreshes for quick typers. Play around with the interval until you find the sweet spot of responsive user interface.

Finally, it is time to fill the data gird with some data for testing, so edit the script of the button and set it to the following:

on mouseUp
local tData, tIndex, tName
put 0 into tIndex
repeat for each line tName in the functionNames
add 1 to tIndex
put tIndex into tData[tIndex]["index"]
put tName into tData[tIndex]["name"]
end repeat
set the dgData of group "DataGrid 1" to tData
end mouseUp

This simple script will fill our data grid with a list of the built-in functions that revTalk has to offer. Click the button, and type away in the filter text field to see the effect. Here's what happens when I type "cos":


Looks pretty good, doesn't it? It certainly was good enough for my use, but there are a few things to bear in mind about this implementation:
- I didn't have to edit the data in the grid.
- I didn't have to support sorting for my particular project.
Both of these limitations can be overcome, but I'll leave that for another time...

Sunday, July 18, 2010

Forums moved over to quartam.on-rev.com

Hi All,

After much deliberation, I have decided to move the forums over from ning.com to my new on-rev based website: http://quartam.on-rev.com/forums/index.php.
And here's an even shorter link: http://forums.quartam.com.

All posts were imported as plain text, and the topics were locked.
Unfortunately, you will have to re-register as a user on the new forum.

I apologize for any inconvenience, caused by this switch.

Best regards,

Jan Schenkel
--
Quartam Reports & PDF Library for Revolution
www.quartam.com