Wednesday, August 18, 2010

Fun with detailed files - and stat

In a previous post, I tried to find a way to convert Unix user and group ids into their corresponding names. After I reported my findings to the use-revolution mailing list, Andre Garzia stepped in, suggesting to take a look at the stat command.

Calling 'stat' through the shell function for every file would be costly and slow; using it to fetch the information for an entire folder in one go wouldn't be so bad, but if you already use the detailed files function built into revTalk, it would seem like a waste of cycles. So I decided to rewrite my work handlers, employing a caching mechanism for the id-to-name mapping, and using 'stat' to pick up the mapping information not available in the cache.
--> script-local 'static' variables

local sGroupIdMap, sUserIdMap

--> public functions and commands

command LoadIdMaps
p_LoadGroupIdMap
p_LoadUserIdMap
end LoadIdMaps

function GroupIdToName pGroupId, pFile
local tName, tShellCommand
put sGroupIdMap[pGroupId] into tName
if tName is empty and the platform is "MacOS" then
-- stat is only available on MacOS X
put p_GetFileStat(pFile, "%Sg") into tName
put tName into sGroupIdMap[pGroupId]
end if
return tName
end GroupIdToName

function UserIdToName pUserId, pFile
local tName, tShellCommand
put sUserIdMap[pUserId] into tName
if tName is empty and the platform is "MacOS" then
-- stat is only available on MacOS X
put p_GetFileStat(pFile, "%Su") into tName
put tName into sUserIdMap[pUserId]
end if
return tName
end UserIdToName

--> private functions and commands

private function p_GetFileStat pFile, pFormat
local tName, tShellCommand
-- make sure to escape spaces in the file name
replace space with backslash & space in pFile
put "stat -f" && pFormat && pFile into tShellCommand
put word 1 of shell(tShellCommand) into tName
return tName
end p_GetFileStat

private command p_LoadGroupIdMap
if the platform is "Win32" then exit p_LoadGroupIdMap
p_LoadFileIdMap "/etc/group", sGroupIdMap
end p_LoadGroupIdMap

private command p_LoadUserIdMap
if the platform is "Win32" then exit p_LoadUserIdMap
p_LoadFileIdMap "/etc/passwd", sUserIdMap
end p_LoadUserIdMap

private command p_LoadFileIdMap pFile, @pIdMap
local tData, tLine
put URL ("file:" & pFile) into tData
set the itemDelimiter to colon
repeat for each line tLine in tData
-- skip empty and comment lines
if tLine is empty \
or char 1 of tLine is "#" then next repeat
-- fill the id map
put item 1 of tLine into pIdMap[item 3 of tLine]
end repeat
end p_LoadFileIdMap

Armed with the above set of commands and functions, we can still use the detailed files function and obtain user and group names from a cache, calling into 'stat' as necessary. Let's update our sample button script:
on mouseUp
local tOldFolder, tNewFolder, tDetailedFiles
answer folder "Select a folder"
if the result is "Cancel" then exit mouseUp
put it into tNewFolder
--> extract the detailed files information
put the defaultFolder into tOldFolder
set the defaultFolder to tNewFolder
put the detailed files into tDetailedFiles
--> load the group and user id maps
LoadIdMaps
--> build the extended file information
local tDetailedFile, tExtendedFiles
local tFile, tUserId, tGroupId
repeat for each line tDetailedFile in tDetailedFiles
-- skip hidden files
if char 1 of tDetailedFile is "." then next repeat
-- fill the extended file entry
put urlDecode(item 1 of tDetailedFile) into tFile
put item 8 of tDetailedFile into tUserId
put item 9 of tDetailedFile into tGroupId
put tFileName & tab & \
UserIdToName(tUserId, tFile) & tab & \
GroupIdToName(tGroupId, tFile) & return \
after tExtendedFiles
end repeat
--> wrap things up
set the defaultFolder to tOldFolder
put char 1 to -2 of tExtendedFiles into field "Files"
end mouseUp

The more observant amongst you may think "If all you needed was a file's user and group name, why not just 'stat' and get it over with?" - well, the detailed files function returns a lot of useful information in one go, including the size of the resource fork of a file on MacOS systems.
Just one more thing: the 'stat' function was added in MacOS X 10.4 Tiger - so if your application still needs to support MacOS X 10.3 Panther, you're going to have to merge in the 'nireport' call from the previous post. Consider it an exercise for the reader.

On to the next challenge!
Tuesday, August 17, 2010

Fun with detailed files

Earlier today, the following question was posted on the use-revolution mailing list: file owner & group names. Rev veteran Monte Goulding was wondering how to convert file owner and group ids into actual user and group names. I happily logged into the Solaris server at work and dug around a bit, finally replying that he could parse this information from the following two files:
/etc/group
/etc/passwd

And what would such a parsing script look like in revTalk? I'm glad you asked:
command LoadGroupIdMap @pGroupIdMap
p_LoadFileIdMap "/etc/group", pGroupIdMap
end LoadGroupIdMap

command LoadUserIdMap @pUserIdMap
p_LoadFileIdMap "/etc/passwd", pUserIdMap
end LoadUserIdMap

private command p_LoadFileIdMap pFile, @pIdMap
local tData, tLine
put URL ("file:" & pFile) into tData
set the itemDelimiter to colon
repeat for each line tLine in tData
-- skip empty and comment lines
if tLine is empty \
or char 1 of tLine is "#" then next repeat
-- fill the id map
put item 1 of tLine into pIdMap[item 3 of tLine]
end repeat
end p_LoadFileIdMap

Given that both files use a colon as item delimiter, and have the name as first item and the id as third item, I extracted the parsing into a separate private command. Put the above handlers in your stack script, and then fetch each id-to-name-mapping before interpreting the detailed files.
Here's a simple button script that uses the above commands:
on mouseUp
local tOldFolder, tNewFolder, tDetailedFiles
answer folder "Select a folder"
if the result is "Cancel" then exit mouseUp
put it into tNewFolder
--> extract the detailed files information
put the defaultFolder into tOldFolder
set the defaultFolder to tNewFolder
put the detailed files into tDetailedFiles
set the defaultFolder to tOldFolder
--> load the group and user id maps
local tGroupIdMap, tUserIdMap
LoadGroupIdMap tGroupIdMap
LoadUserIdMap tUserIdMap
--> build the extended file information
local tDetailedFile, tExtendedFiles
repeat for each line tDetailedFile in tDetailedFiles
-- skip hidden files
if char 1 of tDetailedFile is "." then next repeat
-- fill the extended file entry
put urlDecode(item 1 of tDetailedFile) & tab & \
tUserIdMap[item 8 of tDetailedFile] & tab & \
tGroupIdMap[item 9 of tDetailedFile] & return \
after tExtendedFiles
end repeat
--> wrap things up
put char 1 to -2 of tExtendedFiles into field "Files"
end mouseUp

Once I got home, I wanted to verify this on my MacOS X machine, only to discover that it wasn't properly mapping the uid and gid to user and group names. Intrigued, I dug a bit deeper and found out that MacOS X actually relies on a DirectoryService when it's not running in single-user mode. Lovely, but how can we get what we need using revTalk?
Well, it turns out you can use the nireport command via the shell function to fetch a list of the group and user names with id. So let's add another helper command to do things the MacOS X way, and update our existing commands to use the correct approach, depending on the platform.
command LoadGroupIdMap @pGroupIdMap
if the platform is "MacOS" then
p_LoadNireportIdMap "/groups gid name", pGroupIdMap
else if the platform is "Linux" then
p_LoadFileIdMap "/etc/group", pGroupIdMap
end if
end LoadGroupIdMap

command LoadUserIdMap @pUserIdMap
if the platform is "MacOS" then
p_LoadNireportIdMap "/users uid name", pUserIdMap
else if the platform is "Linux" then
p_LoadFileIdMap "/etc/passwd", pUserIdMap
end if
end LoadUserIdMap

private command p_LoadFileIdMap pFile, @pIdMap
local tData, tLine
put URL ("file:" & pFile) into tData
set the itemDelimiter to colon
repeat for each line tLine in tData
-- skip empty and comment lines
if tLine is empty \
or char 1 of tLine is "#" then next repeat
-- fill the id map
put item 1 of tLine into pIdMap[item 3 of tLine]
end repeat
end p_LoadFileIdMap

private command p_LoadNireportIdMap pParams, @pIdMap
local tData, tLine
put shell ("nireport ." && pParams) into tData
set the itemDelimiter to tab
repeat for each line tLine in tData
put item 2 of tLine into pIdMap[item 1 of tLine]
end repeat
end p_LoadNireportIdMap

This seemed to do the trick on my iMac PowerPC G5 running MacOS X 10.4 Tiger - but when I tried it on my MacBook Pro Intel running MacOS X 10.6 Snow Leopard, it failed as there is no "nireport" command available. As it turns out, Apple dropped NetInfo when MacOS X 10.5 Leopard came out. So my solution is not quite complete, unfortunately.

To be continued...

Sunday, August 1, 2010

BorderLayout example - with resizing

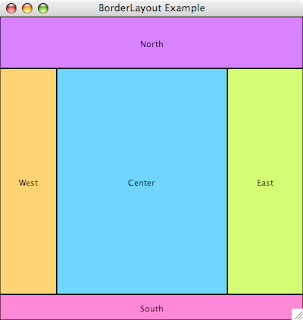
In a previous post, I examined how you can mimic Java's BorderLayout behavior in revTalk. At the end of that post, I promised to explain how you can add resizers to the West and East panels. Just as a reminder, here's what we had accomplished in the previous installment:


Before we get to the meat of the resizers, let's do some preparation work. To clearly show the user that he can drag around the resizers, we'll make a local copy of the vertical divide resize cursor that the RunRev team ships with the IDE. Open the message box and type:

copy image "vdividecursor.gif" of card id 1030 of stack "revMacCursors" to this card

We'll be using that as our cursor later, but it doesn't have to be visible for that to work - so you can hide it now. Next, we add a rectangular button, carefully placing it over the touching edges of the West and Center panels. Set the button's name to "WestResizer" and its width to 5, and make sure its height is the same as the West and Center panel. Here's what it should look like:


Before we add the script, we'll also add two custom properties to the West graphic:
-set the uMinWidth custom property to 75
-set the uMaxWidth custom property to 150

Now that we have the visuals worked out, let's script the resizer button:

local sIsResizing
local sMinX, sMaxX

on mouseEnter
lock cursor
set the cursor to the short id of image "vdividecursor.gif"
end mouseEnter

on mouseLeave
unlock cursor
end mouseLeave

on mouseDown
local tMouseOffset
put item 1 of the mouseLoc - item 1 of the location of me \
into tMouseOffset
put the uMinWidth of graphic "West" + tMouseOffset into sMinX
put the uMaxWidth of graphic "West" + tMouseOffset into sMaxX
put true into sIsResizing
pass mouseDown
end mouseDown

on mouseUp
put false into sIsResizing
pass mouseUp
end mouseUp

on mouseRelease
put false into sIsResizing
pass mouseRelease
end mouseRelease

on mouseMove x,y
if sIsResizing is true then
local tNewX
put min(max(x, sMinX), sMaxX) into tNewX
lock screen
set the left of me to tNewX - 3
set the widthFromLeft of graphic "West" to tNewX
dispatch "resizeCenterPanel" to this card
unlock screen
end if
pass mouseMove
end mouseMove

While it's not too long a script, some explanation is in order:
- the mouseEnter and mouseLeave messages are handled to update the cursor
- the mouseDown message is handled to setup a few script local variables:
-> the sIsResizing variable is used as a flag to track the status
-> the sMinX and sMaxX variables are calculated once, based on the offset between the mouse and the resizer button, and taking into account the minimum and maximum width we set earlier
-> calculating those once helps cut down on the math later on
- the mouseUp and mouseRelease messages are handled to turn off the sIsResizing flag
- the mouseMove message is handled to resize the West and Center panels
-> but only if the sIsResizing flag is true
-> it uses the sMinX and sMaxX variables to make sure we don't go too far either way
-> it updates the resizer button itself, the West panel, and the Center panel.

To make this work, we obviously also have to add a handler for our custom 'resizeCenterPanel' event. We'll add that to the card script in a bit, after we've finished the resizer for the East panel. So duplicate the WestResizer button, name the copy EastResizer and move it over to the right, placing it over the touching edges of the East and Center panels.

Before we add the script, we'll also add two custom properties to the East graphic:
-set the uMinWidth custom property to 100
-set the uMaxWidth custom property to 200

Next, update its script to:

local sIsResizing
local sMinX, sMaxX

on mouseEnter
set the lockCursor to true
set the cursor to the short id of image "vdividecursor.gif"
end mouseEnter

on mouseLeave
set the lockCursor to false
end mouseLeave

on mouseDown
local tMouseOffset
put item 1 of the mouseLoc - item 1 of the location of me \
into tMouseOffset
put the width of this stack - \
the uMinWidth of graphic "East" + \
tMouseOffset into sMaxX
put the width of this stack - \
the uMaxWidth of graphic "East" + \
tMouseOffset into sMinX
put true into sIsResizing
pass mouseDown
end mouseDown

on mouseUp
put false into sIsResizing
pass mouseUp
end mouseUp

on mouseRelease
put false into sIsResizing
pass mouseRelease
end mouseRelease

on mouseMove x,y
if sIsResizing is true then
local tNewX
put min(max(x, sMinX), sMaxX) into tNewX
lock screen
set the left of me to tNewX - 3
set the left of graphic "East" to tNewX
set the widthFromLeft of graphic "East" to \
the width of this stack - tNewX
dispatch "resizeCenterPanel" to this card
unlock screen
end if
pass mouseMove
end mouseMove

The difference with the WestResizer is that the EastResizer also has to take into account the width of the stack, but that's not too complicated. Finally we'll update the card script, adding a handler for the 'resizeCenterPanel' custom event, and we'll also take care of updating the resizer's location and height when the stack is resized. The new card script looks like this:

on resizeStack pNewWidth, pNewHeight
local tCenterHeight, tCenterWidth
--
lock screen
-- update the north and south panels
set the widthFromLeft of graphic "North" to pNewWidth
set the widthFromLeft of graphic "South" to pNewWidth
set the bottom of graphic "South" to pNewHeight
put the top of graphic "South" - \
the bottom of graphic "North" \
into tCenterHeight
-- update the west and east panels
set the heightFromTop of graphic "West" to tCenterHeight
set the heightFromTop of graphic "East" to tCenterHeight
set the right of graphic "East" to pNewWidth
put the left of graphic "East" - \
the right of graphic "West" \
into tCenterWidth
-- update the west and east resizers
set the heightFromTop of button "WestResizer" to tCenterHeight
set the heightFromTop of button "EastResizer" to tCenterHeight
set the left of button "EastResizer" to \
the left of graphic "East" - 3
-- update the center panel
set the widthFromLeft of graphic "Center" to tCenterWidth
set the heightFromTop of graphic "Center" to tCenterHeight
--
unlock screen
pass resizeStack
end resizeStack

--> custom event handlers

on resizeCenterPanel
local tCenterWidth, tCenterHeight
put the top of graphic "South" - \
the bottom of graphic "North" \
into tCenterHeight
put the left of graphic "East" - \
the right of graphic "West" \
into tCenterWidth
lock screen
set the left of graphic "Center" to the right of graphic "West"
set the top of graphic "Center" to the bottom of graphic "North"
set the widthFromLeft of graphic "Center" to tCenterWidth
set the heightFromTop of graphic "Center" to tCenterHeight
unlock screen
pass resizeCenterPanel
end resizeCenterPanel

--> helper property setters

setProp widthFromLeft pNewWidth
local tRectangle
--
lock screen
put the rectangle of the target into tRectangle
put item 1 of tRectangle + pNewWidth into item 3 of tRectangle
set the rectangle of the target to tRectangle
unlock screen
end widthFromLeft

setProp heightFromTop pNewHeight
local tRectangle
--
lock screen
put the rectangle of the target into tRectangle
put item 2 of tRectangle + pNewHeight into item 4 of tRectangle
set the rectangle of the target to tRectangle
unlock screen
end heightFromTop

And there we have it: a BorderLayout with resizers for the West and East panels.


Once you're happy with the way the resizers work, you can change the style of the WestResizer and EastResizer button to transparent. They'll continue to work just fine, but won't be visible. With a little more work, you can also add resizers for the North and South panels. But I'll leave that as an exercise to the reader...